
PTC Creo Adapter
SBE PTC Creo Plugin Documentation Template
1. Getting Started: Using the Adapter
1.1 Operations Overview
Attach
Publish
Refresh - Soft/Hard
Auto Sync
Verify
Reset
Migrate (Upgrade)
1.2 Accessing the Adapter
1.2.1 Digital Thread Menu

1.3 Attaching
The following channel property is needed for creating a channel.
Name | Mandatory | Description |
|---|---|---|
modelName | Y | Name of the Assembly Model |
1.3.1 Attach
To attach a project, the user must click the Attach button from the Digital Thread menu. This opens a window (as shown below), where the user needs to provide the necessary information such as selecting or creating a valid partition and branch and then proceed to create the channel.
When clicking on Attach from within the Adapter, the channel properties are automatically populated in the Attach screen.
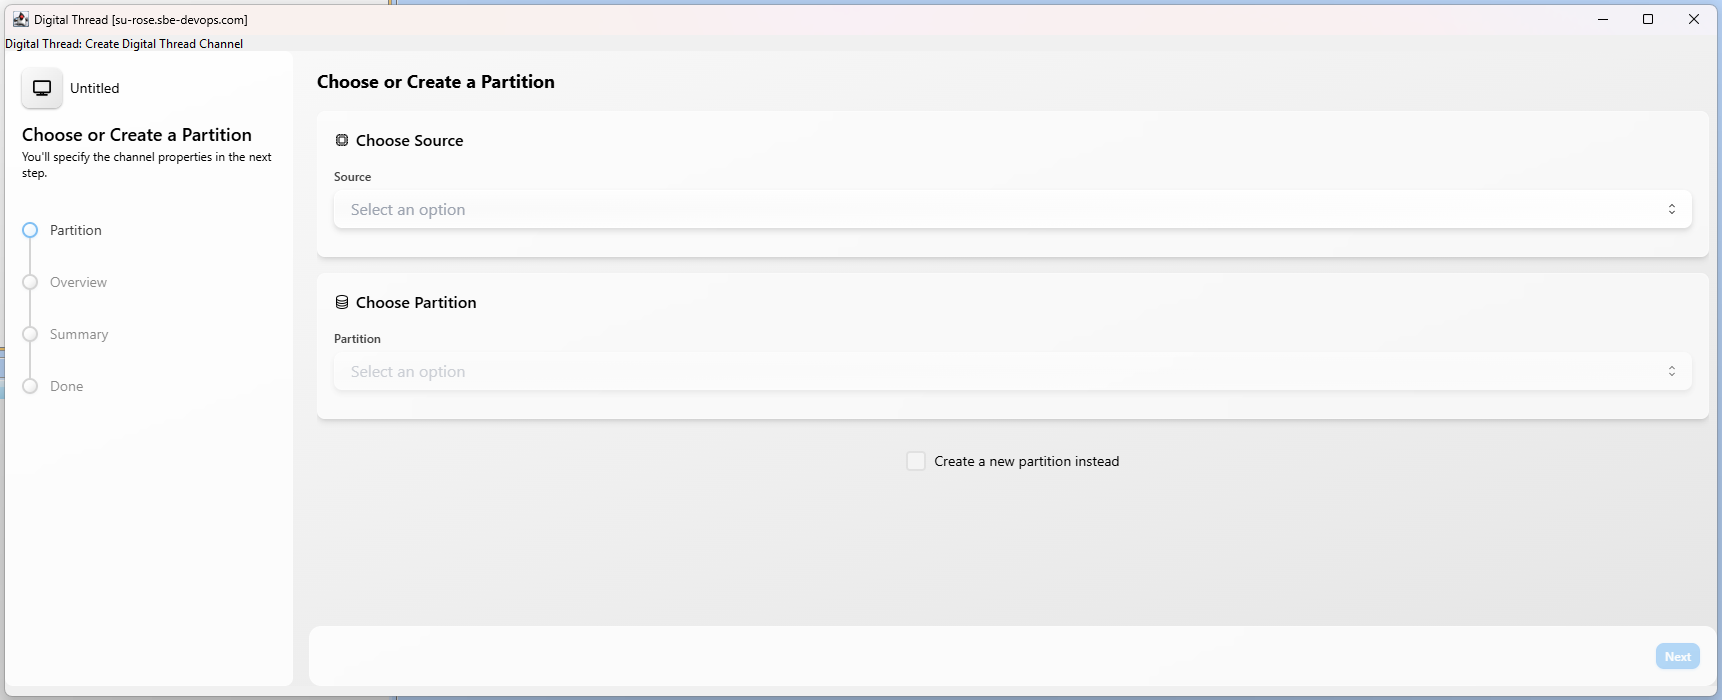
Attach
1.4 Publishing Items
The following components of a Model are published
Model (Assembly/Part)
Dimensions
Parameters - Supported types: String, Double, Boolean, Integer
Part Material Information
1.5 Refreshing Items
Only ASOT Refresh is supported.
The following types are supported for Refresh
Dimensions
Parameters
Note: Only the value property of Dimension and Parameter.
1.5.1 Hard Refresh
In a hard refresh, the plugin retrieves the entire published data from the SBE. A complete refresh is performed on all items received, ensuring that the local model is fully synchronized with the server.
1.5.2 Soft Refresh
In a soft refresh, the entire dataset is not retrieved. Priority is given to locally modified data that has not yet been published. This allows users to continue making changes locally without the risk of those changes being overwritten. Only data that has not been modified locally and has been updated in SBE is received and refreshed during this operation.
1.5.3 Auto Sync
Auto Syncis a feature exclusive to Creo, this feature is useful when we want to automatically keep Sync'ing Creo with SBE.
Click on Button
Auto Syncto launch the window.Set the
Time, this dictates the interval the application will wait before starting the nextSync.Please note, On clicking
Stop, the process will not stop right away and will wait till the current Sync is finished.Because of the way Creo supports Plugins the app may look like it is not responding on a button click, but it just waits till the current operation is finished to perform the operation.
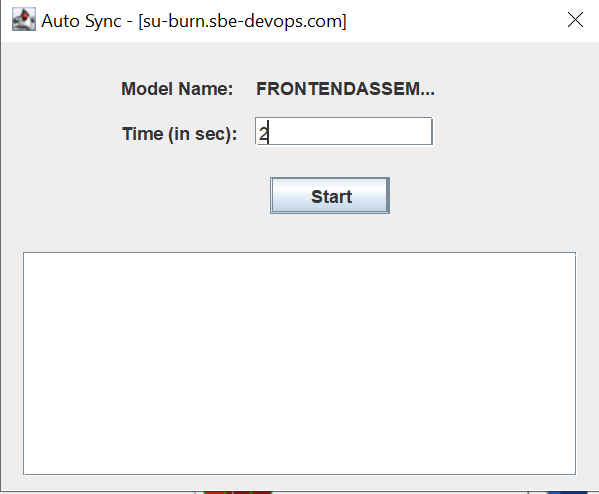
Auto Sync
Note:
Please note due to the nature of Creo application, the Refresh window may look likes it frozen during operation.
Clicking
Stop, will not stop current operation but will only stop Auto-Refresh process.It is possible clicking
Stopmay take a few seconds to update the window.
1.6 Advanced Operations
1.6.1 Verify
The verify operation refrains from making any modifications to the external system. Instead, it focuses on comparing the items in the external system with those received from the SBE platform.
During this process, the adapters evaluate the metadata, properties, and relationships. They also check for any missing or extra items.
1.6.2 Force Publish
Force Publish triggers a full publish of data, regardless of whether only a subset of data has changed since the last operation. It bypasses the usual "delta" mechanism, which would otherwise only send changes since the last publish. This is useful when you want to ensure that all data is sent to the target system, even if some data hasn't changed or if previous publishes may have missed something.
This feature is available starting from version 8.x.
1.6.3 Force Refresh
Force Refresh triggers a full refresh of data from the source, again bypassing the delta mechanism. It ensures that the local or client system is completely updated with the latest data from the source, not just the changes since the last refresh. This is helpful for resolving sync issues or when you want to guarantee that the client has the most up-to-date and complete data
This feature is available starting from version 8.x.
1.6.4 Clear Drafts
The Clear Drafts action in the SBE platform is an advanced operation available in the Digital Thread adapter menu. This action is designed to remove or clear any "draft" data or unpublished changes that are stored locally for a given channel or project. Drafts typically accumulate when you make changes but haven't yet published them to the SBE server.
1.6.5 Reset
The Rest operation clears the local metadata for the current channel and removes stale subscription data from the project.
2. Document Overview
2.1 Document Overview
This document provides essential information for using, configuring, and supporting the SBE Vision adapters for PTC Creo. It covers multiple adapter products, each supporting different versions of the external tool.
2.2 Document Orientation
This document is designed to inform users with various roles:
End Users should begin with Section 1 to understand how to access and operate the adapter, and Section 5 for issues pertaining to the setup, configuration, and use of the digital tool itself.
Digital Thread Specialists should focus on Section 1, and also consult Sections 3, 4, and 5 for deployment and semantic mapping. Section 11 contains details related to mapping items from this tool into a semantic ontology.
Administrators should refer to Section 6 and beyond for setup, security, support, and version management.
3. Adapter Use Cases
3.1 Adapter Overview
The purpose of this adapter is to allow the data contained within instances of Creo to connect with the SBE Digital Thread platform. Given that Creo is a rich-client tool, the usage of this adapter is governed by end users operating that tool on the desktop of their workstation. This adapter was built using the SBE Java Pro-SDK product.
4. Supported Versions
4.1 Supported Adapter Products
This document covers all the version of adapter that support SBE 7.x (woburn) or 8.x (melrose)
4.2 External Tool Versions Supported
The Adapter was tested on
Creo 7.0.4
Creo 8.0.6
Creo 10.0.4
Creo 11.0.3
4.3 Differences Across Tool Versions
Functionality remains consistent across versions
4.4 Supported Plug-Ins and Add-Ons
No plug-ins or add-ons are currently supported
5. Digital Tool Best Practices
5.1 Tool Configuration Considerations
There is no separate configuration needed for the Creo plugin. Installing it with the built-in plugin installer handles most of the required setup. The only configurations needed are for the HostName and log settings. Please refer to section 6.2 for instructions on configuring the hostname and logs.
6. Installation
6.1 Installation Instructions
Supported OS: Windows server 2019, 2016, 2022, Windows 10
Java: 1.8 (Creo 5, 7), 11 (Creo 8, 10), 17 (Creo 11)
6.1.1 Installation package
For Manual:
A zip file which will give 2 directories with install and binaries
`binaries` containing Plugin jar files
`install` containing Logging config xml,
config.json,protk.dat,config.profile, Locale
Text file msg_sbedt.txtand resources and finally the Digital Thread ribbon

Binaries Directory Content
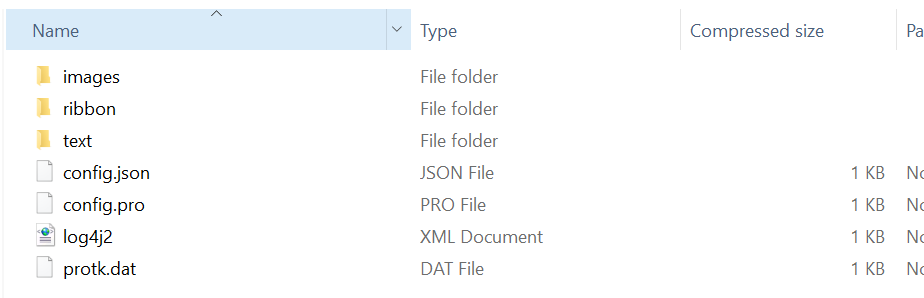
Install Directory Content
For Automatic installation you need only
creo-plugin-X.X.X-<Y.Y.Y>.exe
6.1.2 Installing the plugin
Here are two ways to install the plugin
Manual Installation – Requires configuring paths and files manually.
Automatic Installation (Recommended) – A guided installer that handles setup for you with minimal effort.
6.1.2.1 Prerequisites
Supported Creo, please look at overview to see the supported version list
The plugin was testing with following Java versions for respective Creo versions
Creo version | Java version |
|---|---|
5 | 1.8 |
7 | 1.8 |
8 | 11 |
10 | 11 |
11 | 11, 17 |
6.1.2.2 Manual Installation
Create a directory, eg: c:\sbe\creo
Copy the text/image directory, the 3 jar files,
config.proandprotk.datto directory created in previous stepUpdate the path of the jar files in
config.proandprotk.datA Sample
config.pro
add_java_class_path C:\sbe\creo\otk.jar;C:\sbe\creo\sbe-creo-plugin-7.4-7.0.8-dependencies.jar;
jlink_java_command C:\Program Files\Java\jdk1.8.0_251\bin\java.exe
Sample
protk.dat
name                DT
startup             java
java_app_class      com.sbevision.adapters.ptc.creo.DigitalThreadApplication
java_app_start      start
java_app_stop       stop
java_app_classpath  c:\sbe\creo\sbe-creo-plugin-7.4-7.0.8.jar
allow_stop          true
TEXT_DIR            .\text
delay_start         false
end
Update the path to jdk for the variable
jlink_java_command
6.1.2.3 Automatic Installation (Using Installer)
Follow the steps below to install the Digital Thread CREO Plugin using the installer:
Launch the Installer
Locate and open the installer file (with.exeextension).Handle Windows Defender Warning
If Windows Defender displays a warning, click More Info.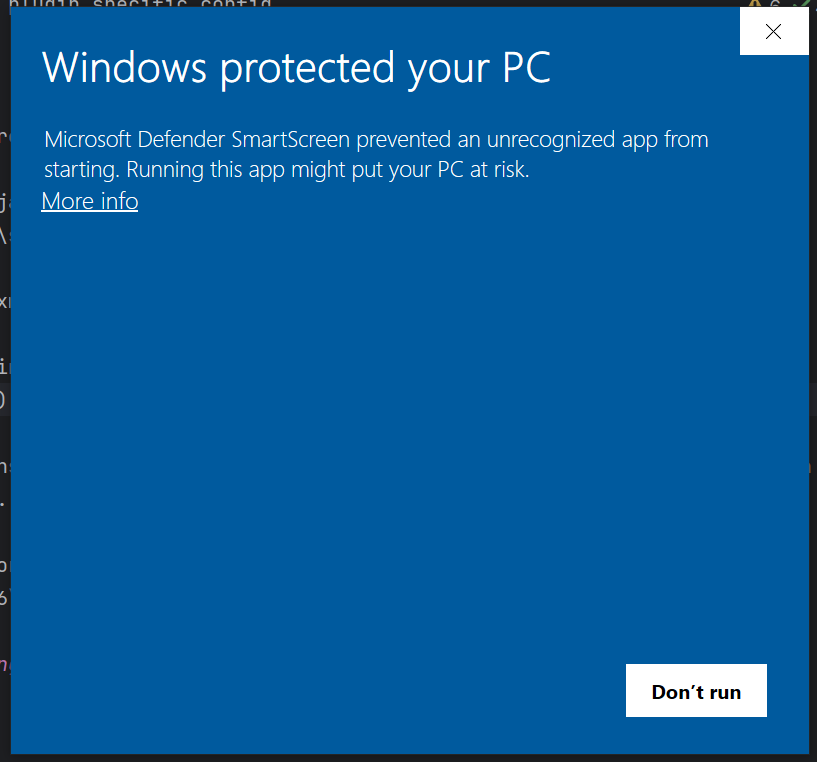
Run Anyway
Click Run Anyway. If a User Account Control (UAC) dialog appears, click Yes.
Welcome Page
The installer will display a welcome screen. Click Next to proceed.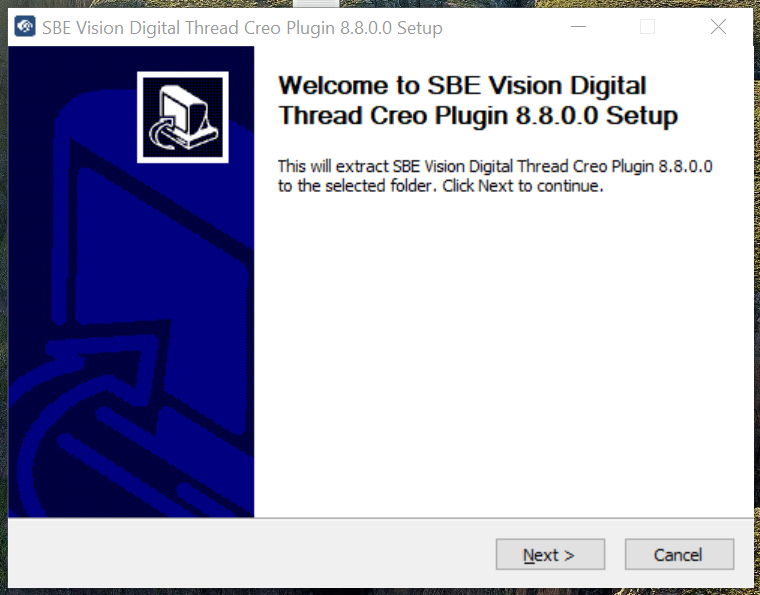
Configure SBE Server Endpoint
Enter your SBE server endpoint (e.g.,<https://sbe.acme.com).>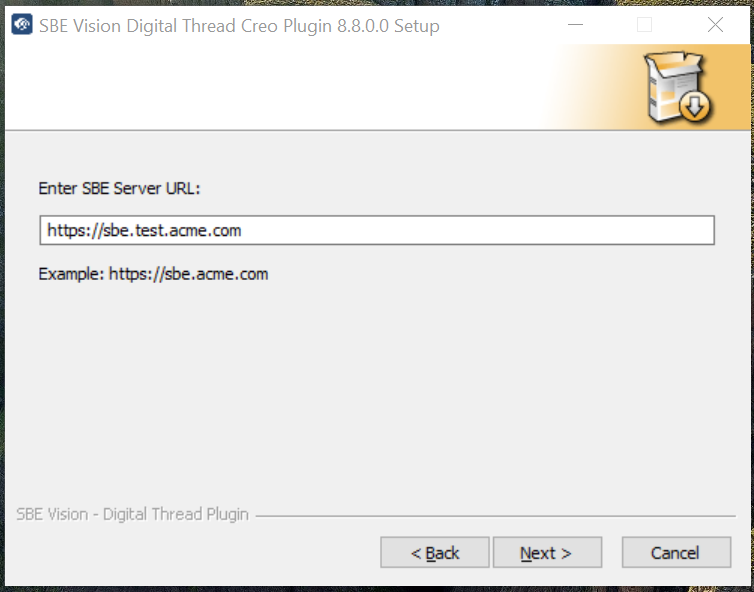
Configure Certificate (optional)
If required, also provide the location of the root cert, please note this should be a pem or
equivalent format (human readable).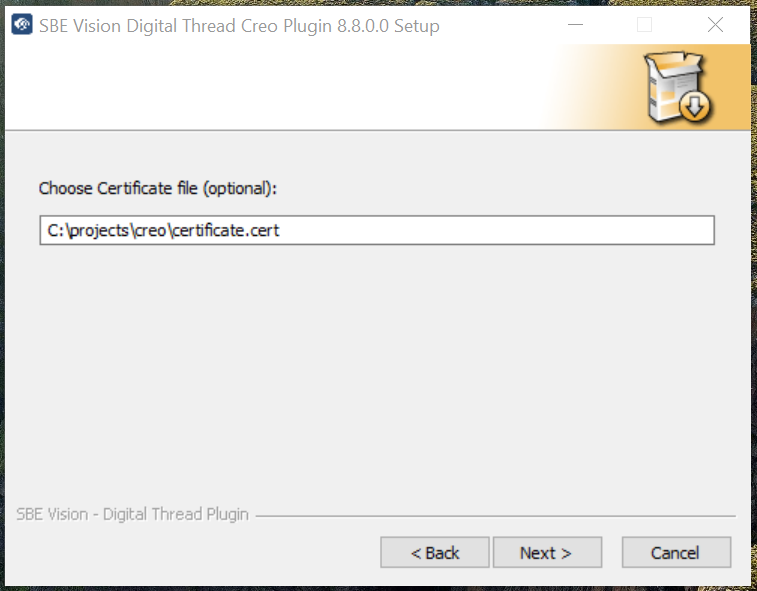
Configure Step File Location (optional)
Provide the step file location if required.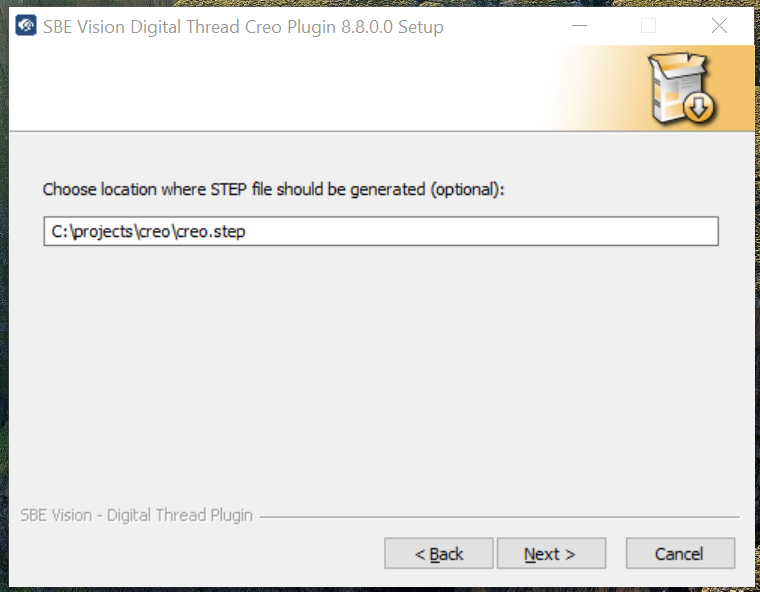
Select Java Home Path
Browse and select your Java home directory, then click Install.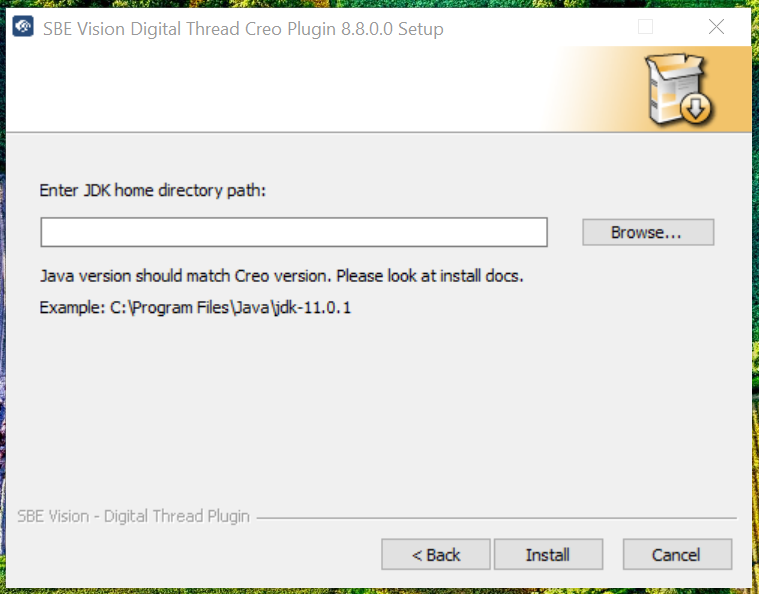
Installation Complete
Once the process is finished, you will see a confirmation screen.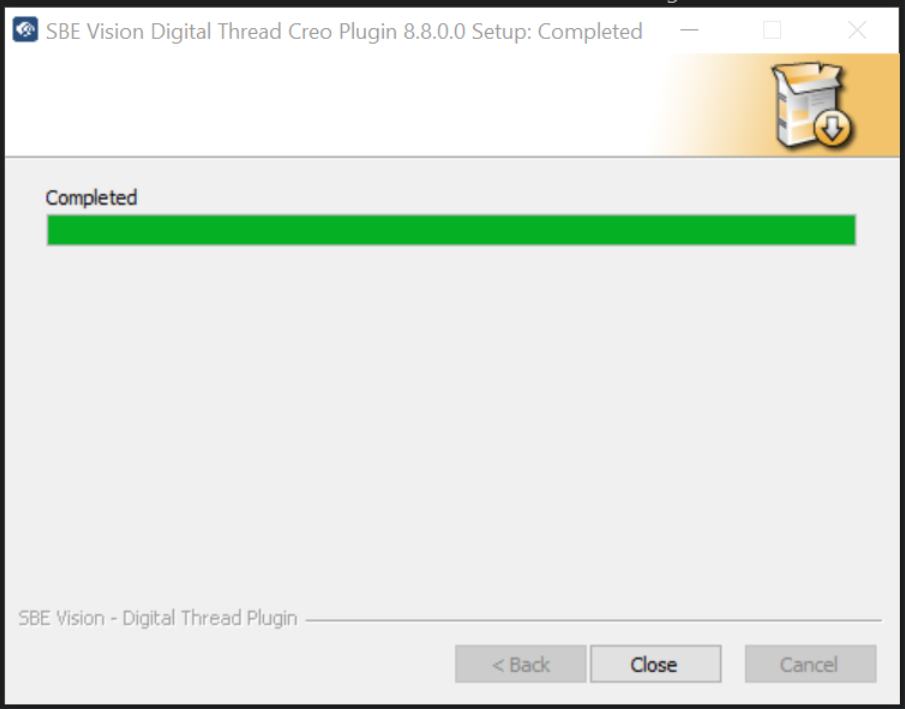
The Digital Thread CREO Plugin is now successfully installed and ready to use.
6.1.2.4 Adding Adapter to Creo
To configure Creo to use the plugin either use the shortcut method or adding a Auxiliary Application
Add the path C:\sbe\creo to the shortcut, now the creo will load the Digital Thread automatically when it starts.
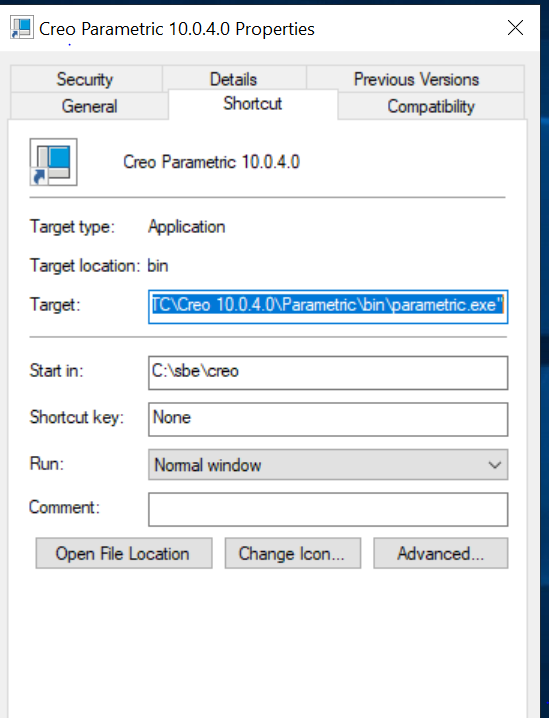
For automatic installer the start in path will be 'C:\Users\Admin\DigitalThread\creo'.
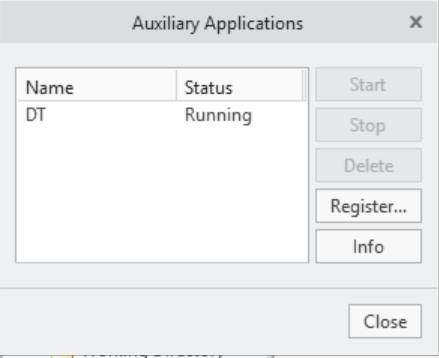
Go to Utilities →
Auxiliary Application→ add the protk.dat and start, it will show you status as Running
Importing the Digital Thread ribbon
To import the
Digital Threadmenu options, pick the ribbon for the respective Creo version from ribbon directory under install.File - > Options → Customize -> Ribbon → ToolkitCommands from Category
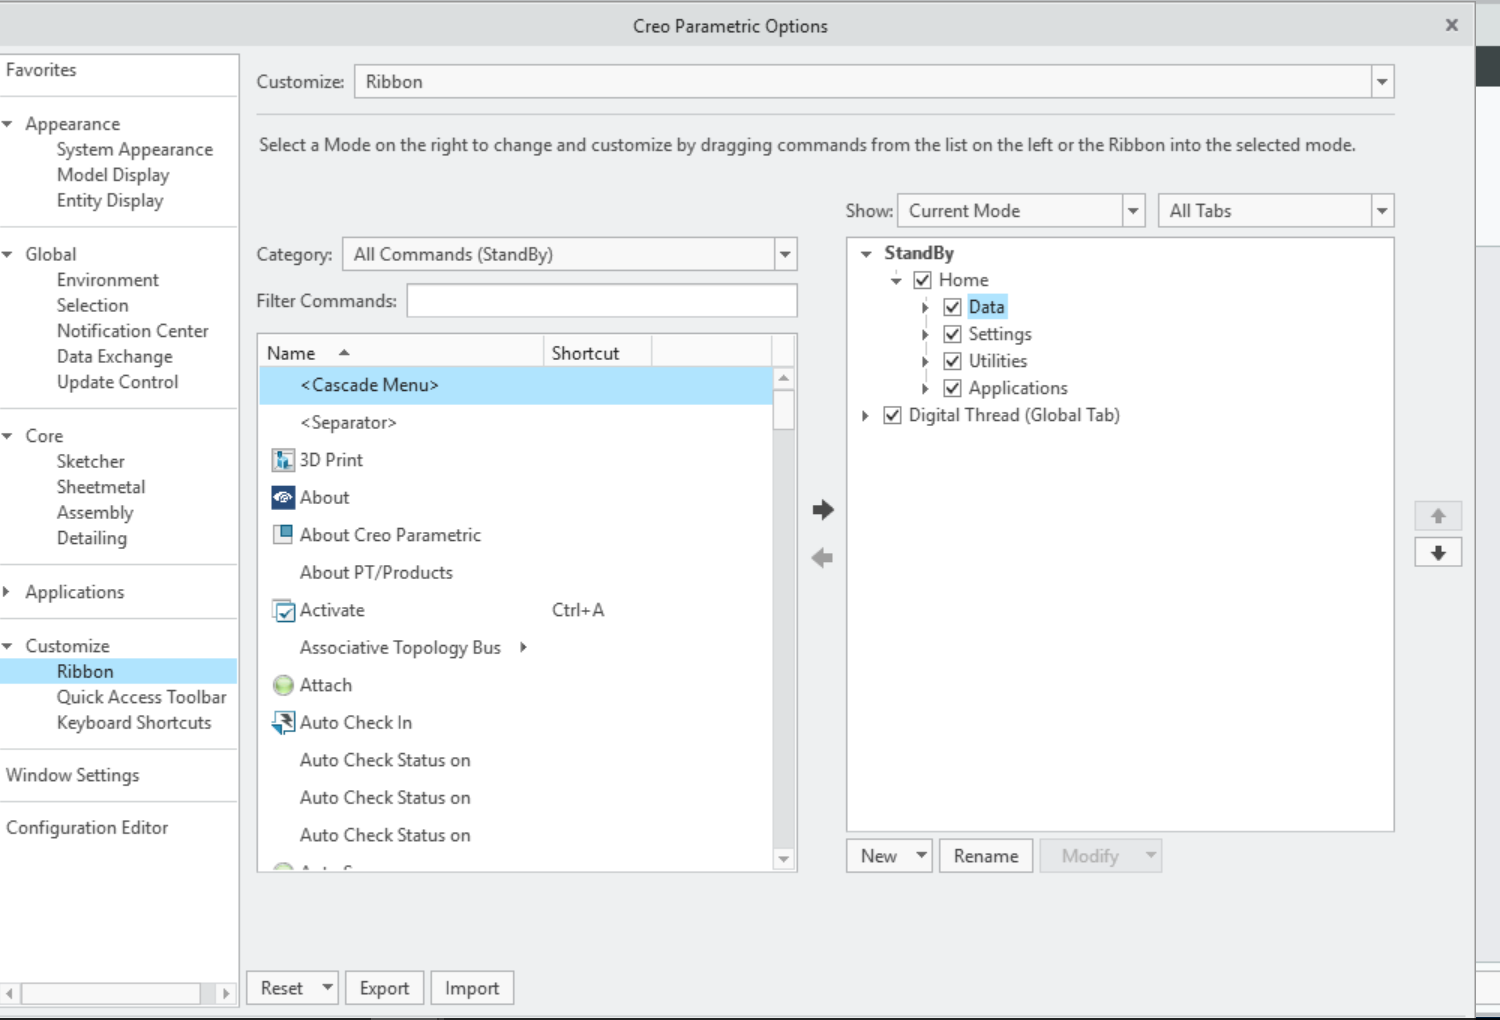
Custom Ribbon
Click on the Import button and select the
creo_<version>-dt-ribbon.uifile from the install folder
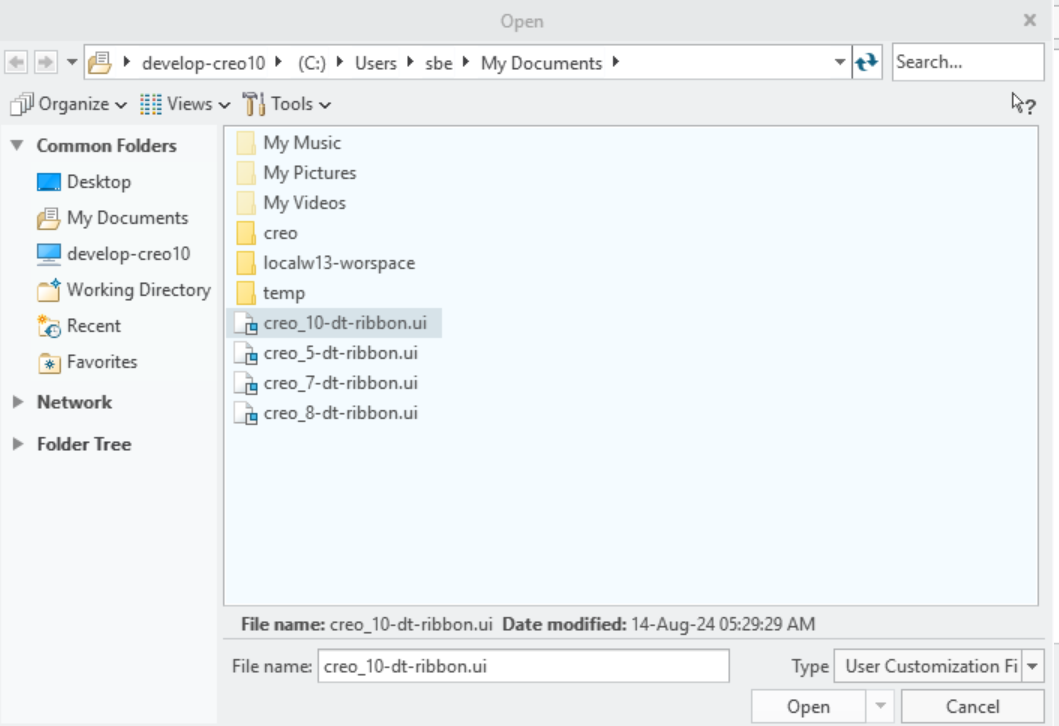
Note: Each version has different ribbon, so user must import respective version ribbon.
6.1.2.5 Logging
The logging can be configured by updating the log4j2.xml, the location of the xml must be
$USER_HOME\SBE\creo\. If no logging config is added, the default location of the log file is %TEMP%
6.1.2.6 Trouble Shooting installation
Error: Failed to start DT application
Possible reasons
The path to jars files is incorrect in
config.proorprotk.datThe JDK installed is not compatible with the application, please refer to Installation section for supporting Java versions
If we have multiple JDK installed on the machine, we can use the
jlink_java_commandproperty inconfig.proto point to the correct java, please note that this is the full path tojava.exeMake sure the text and the images directories are copied to the directory where we have
config.proandprotk.dat
To verify that the installed java is 64bit, run the command java -version from terminal
java version "1.8.0_281"
Java(TM) SE Runtime Environment (build 1.8.0_281-b09)
Java HotSpot(TM) 64-Bit Server VM (build 25.281-b09, mixed mode)
No error but cannot see Digital Thread Items
The ribbon was imported successfully, and we are still unable to see the buttons on the ribbon
Make sure we started Creo in the Directory where we copied all the plugin files and directories, eg: c:\sbe\creo
6.2 Configuration (applicable to Manual install method)
Copy the config.json to $USER_HOME/SBE/creo/config.json
Update the fields as shown below: -
Property | Description |
|---|---|
restEndPoint | SBE endpoint, https://sbe.acme.com |
certFilePath | If self-signed certificates are used on SBE, copy the root certificate full path, eg: c:\sbe\root.pem |
Note: The certificate must be in a human readable format, like pem
7. Channels and Mappings
7.1 Channel Definition
Name | Mandatory | Description |
|---|---|---|
modelName | Y | Name of the Assembly Model |
7.2 Approaches to Mapping
Mappings should be created based on the shapes of the items being published.
Refer to Schema section for more information
e.g; ModelPart, Assembly
8. Security and Access
8.1 Authorization and Roles
The adapter assumes user has necessary read permissions on the Model for Publishing a Channel
Similarly adapter assumes user has necessary write permissions on the Model (Parameters and Dimensions) to run any type of Refresh Operation
8.2 Secure Communication
The adapter communicated with SBE server using https and grpc, the necessary ports must be opened on the firewall for the adapter.
The port 443 is needed for https communication
Protocols in Use
gRPC: For fast, bidirectional, binary communication between systems.
HTTPS: For browser-based access and RESTful services.
9. Release Notes
9.1 Version History
8.9 (Nov 13, 2025)
Fix Auto Sync issue
JX 7.42.0
Support Creo 11
Added `Clear Drafts` action in Digital Thread menu
Show more metrics in tracking dashboard for Refresh
Auto adjust size of embedded windows
CREO Plugin Installer
Added new menu item
Clear DraftsMinor improvements in Refresh
8.8 (Sep 25, 2025)
SDK 8.18
Fix double login issue with embedded SBE UI's
Report better status of Refresh
8.7 (Aug 14, 2025)
SDK 8.17
Added new menu items
Clear Drafts,Force Publish,Force RefreshItem V7
8.6 (Jul 04 ,2025)
SDK 8.15
8.5 (Jul 03, 2025)
SDK 8.14
Rename
Reset CommittoReset
8.4 (Apr 17, 2025)
SDK 8.11
8.3 (Feb 15, 2025)
SDK 8.9
JX Browser 7.42.0
8.2 (Jan 07, 2025)
SDK 8.8
Use
Connectionbased API
8.1 (Aug 14, 2024)
SDK 8.3
Update installation docs
Creo 10 support
Implement Verify
8.0 (Jun 04, 2024)
Support SBE 8
7.11 (Nov 13,2025)
SDK 7.50
JX 7.42.0
Support Creo 11
Added `Clear Drafts` action in Digital Thread menu
Show more metrics in tracking dashboard for Refresh
Auto adjust size of embedded windows
CREO Plugin Installer
Added new menu item
Clear DraftsMinor improvements in Refresh
7.10 (Oct 28,2024)
SDK 7.44
7.9 (Oct 9, 2024)
SDK 7.43
7.8 (Oct 7,2024)
SDK 7.42
7.7 (Sep 13, 2024)
Strongly typed shapes for Parameters
SDK 7.39
10. Technical Reference
10.1 Identity
The following are the locators for respective types
Assemby
Name | Description |
|---|---|
id | Name of the Assembly |
BomLine
Name | Description |
|---|---|
id | BomLine Name |
Model Part
Name | Description |
|---|---|
id | Name of the Part |
Parameter
Name | Description |
|---|---|
name | Name of the Parameter |
parent | Name of the parent model |
part | Name of top level part |
Dimension
Name | Description |
|---|---|
id | Id of the Dimension |
parent | Name of the parent model |
Material
Name | Description |
|---|---|
id | Name of the Material |
parent | Name of the parent model |
Part Material
Name | Description |
|---|---|
name | Name of the PartMaterial |
10.2 Schema Support
The following classes are currently supported:
Model, Parameter, Dimension
10.2.1 Type: Assembly
Property Name | Data Type | Req’d | R/O | Description |
|---|---|---|---|---|
name | String | yes | Yes | Name of the Assembly. e.g.: drill_chuck.asm |
Links
Name | Types | Mult. | Description |
|---|---|---|---|
Parts | BomLine | 0..\* | All the children of Assembly. |
Parameters | Parameter | 0..\* | All the Parameters on Assembly. |
10.2.2 Type: BomLine
Property Name | Data Type | Req’d | R/O | Description |
|---|---|---|---|---|
name | String | Yes | Yes | BomLine name. e.g.:chuck_collar.prt |
quantity | Integer | Yes | Yes | Quantity |
findNumber | Integer | Yes | Yes | Find Number |
Links
Name | Types | Mult. | Description |
|---|---|---|---|
Part | ModelPart | 1..1 | Part |
10.2.3 Type: ModelPart
Property Name | Data Type | Req’d | R/O | Description |
|---|---|---|---|---|
name | String | Yes | Yes | Name of the Part. e.g.: chuck.prt |
Links
Name | Types | Mult. | Description |
|---|---|---|---|
Dimensions | Dimension | 0..\* | All the Dimension on Part. |
Parameters | Parameter | 0..\* | All the Parameters on Part. |
Materials | Material | 0...1 | Active Material on Part. |
PartMaterial | PartMaterial | 0...1 | Active PartMaterial on Part. |
10.2.4 Type: Parameter
Holds the parameter of a model
Supported types are String, Double, Integer, Boolean
Property Name | Data Type | Req’d | R/O | Description |
|---|---|---|---|---|
name | String | Yes | Yes | Parameter name. e.g.: DESCRIPTION |
value | String | Yes | no | Value of the parameter |
designate | Boolean | no | no | |
unit | String | Yes | no | UOM |
description | String | no | no | Description |
type | String | Yes | no | Type of the parameter. e.g.:StringParameter, DoubleParameter |
10.2.5 Type: Dimension
Holds the dimensions of a model
Property Name | Data Type | Req’d | R/O | Description |
|---|---|---|---|---|
name | String | Yes | Yes | Dimension name. e.g.: d0 |
id | int | no | Yes | Id of the dimension |
value | double | Yes | Yes | Dimension value |
10.2.6 Type: Material
Property Name | Data Type | Req’d | R/O | Description |
|---|---|---|---|---|
name | String | Yes | Yes | Name of the Material. e.g.: PTC_SYSTEM_MTRL_PROPS |
description | String | no | no | Description |
subtype | String | no | no | Sub Type. e.g.: Linear |
thermalMaterialType | String | no | no | Thermal Type. e.g.: Isotropic |
structuralMaterialType | String | no | no | Structural Type. e.g.: Orthotropic |
Links
Name | Types | Mult. | Description |
|---|---|---|---|
Parameters | Parameter | 0..\* | All the Parameters of the Material. |
10.2.7 Type: PartMaterial
When publishing PartMaterial name prefix of
PartMaterialis added to the parent part name
Property Name | Data Type | Req’d | R/O | Description |
|---|---|---|---|---|
name | String | Yes | Yes | Name of the PartMaterial e.g.:PartMaterial-chuck.prt |
Links
Name | Types | Mult. | Description |
|---|---|---|---|
Materials | Material | 0...1 | Active Material on Part. |
11 Upgrade
11.1 Migrate from SBE 7.x to SBE 8.x
This section will cover the guide to upgrade from your SBE 7.x to SBE 8.x