
MS Excel Adapter
Adapter & Extension Package Documentation go together
Plugins are Separate
1. Getting Started: Using the Adapter
1.1 Operations Overview
The SBE Excel Adapter is used to connect an Excel workbook to the digital thread. It is a hybrid adapter, as the adapter itself runs as a service on an SBE stack, but is controlled via a plugin within the Excel application itself, rather than through the SBE Digital Thread Hub UI.
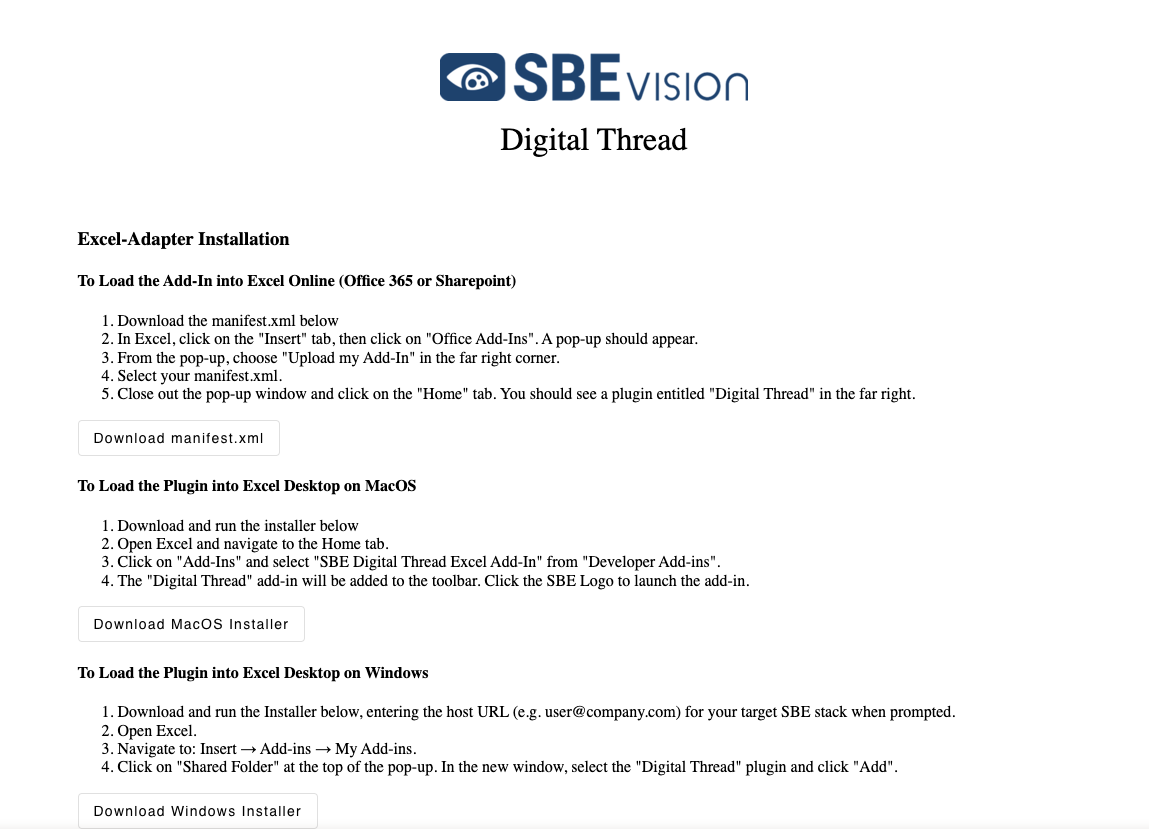
The excel-adapter can be loaded as an “Add-In” on the Microsoft Excel web application (via Sharepoint or Office 365) or in the Windows or Mac Excel desktop applications. Installation for desktop Excel clients is simplified via Windows and MacOS installers that can be downloaded from an endpoint on the service itself, as described in Section 1.2.
Upon loading the Add-In and logging in with SBE credentials, the Excel Adapter allows a user to select tables from the attached workbook and perform all basic SBE data operations (Full-Publish, Full-Refresh, Verify and Reset). Being an SBE Lite adapter, some advanced operations are not available. All operations can be performed on both authoritative and subscription data.
The manifest.xml file
Once the Excel Adapter service is deployed to an SBE stack, the Digital Thread Add-In is loaded to Excel via a manifest file (manifest.xml). The manifest file simply points the Excel Add-In environment to the excel-adapter application running on the SBE stack. Instructions for installing the Add-In are provided in Section 1.2.
1.2 Accessing the Adapter
The Digital Thread Add-In can be run in the Microsoft Excel web application (via Sharepoint or Office 365) or in the Windows or MacOS Excel desktop applications.
Installation
Once the excel-adapter microservice is loaded and running, a url is exposed from which a stack-specific manifest file (for web-based versions of the Excel application) or Windows/Mac installers can be downloaded:
https://{{hostname}}/excel-adapter/#/install
Excel Web Application
In any browser, access the endpoint provided above, substituting the path to the SBE stack for {{hostname}} and select “Download manifest.xml”.
Open the Excel web application and navigate to the Home tab.
Click the “Add-Ins” drop down, and select “More Add-Ins” at the bottom of the context menu.
In the pop-up, select “MY ADD-INS” in the upper left corner.
Select the “Manage My Add-Ins” dropdown in the upper right corner and select “Upload My Add-In”.
Click “Browse” in the pop-up, select the manifest.xml file downloaded in Step 1.
Click “Upload”. You SBE Digital Thread Add-In should appear in the Home menu bar.
Microsoft Windows
In any browser, access the endpoint provided above, substituting the path to the SBE stack for {{hostname}} and select “Download Windows Installer”.
Close all instances of the Excel desktop application.
When download is complete, run the installer and enter the host url (same as {{hostname}} above) when prompted.
A manifest file will be generated, saved and loaded into Excel.
The SBE Digital Thread Add-In should appear in the Home menu bar upon opening Excel.
MacOS
In any browser, access the endpoint provided above, substituting the path to the SBE stack for {{hostname}} and select “Download Mac Installer”.
Close all instances of the Excel desktop application.
When download is complete, run the installer and enter the host url (same as {{hostname}} above) when prompted.
A manifest file will be generated, saved and loaded into Excel.
The SBE Digital Thread Add-In should appear in the Home menu bar upon opening Excel.
1.3 Attaching & Connecting
Attaching is the process of connecting your Excel workbook to the digital thread.
After loading your manifest.xml file, selecting the Digital Thread icon will open the SBE Excel Adapter plugin. The plugin will open to the login screen. Enter your SBE credentials and select “Login”.
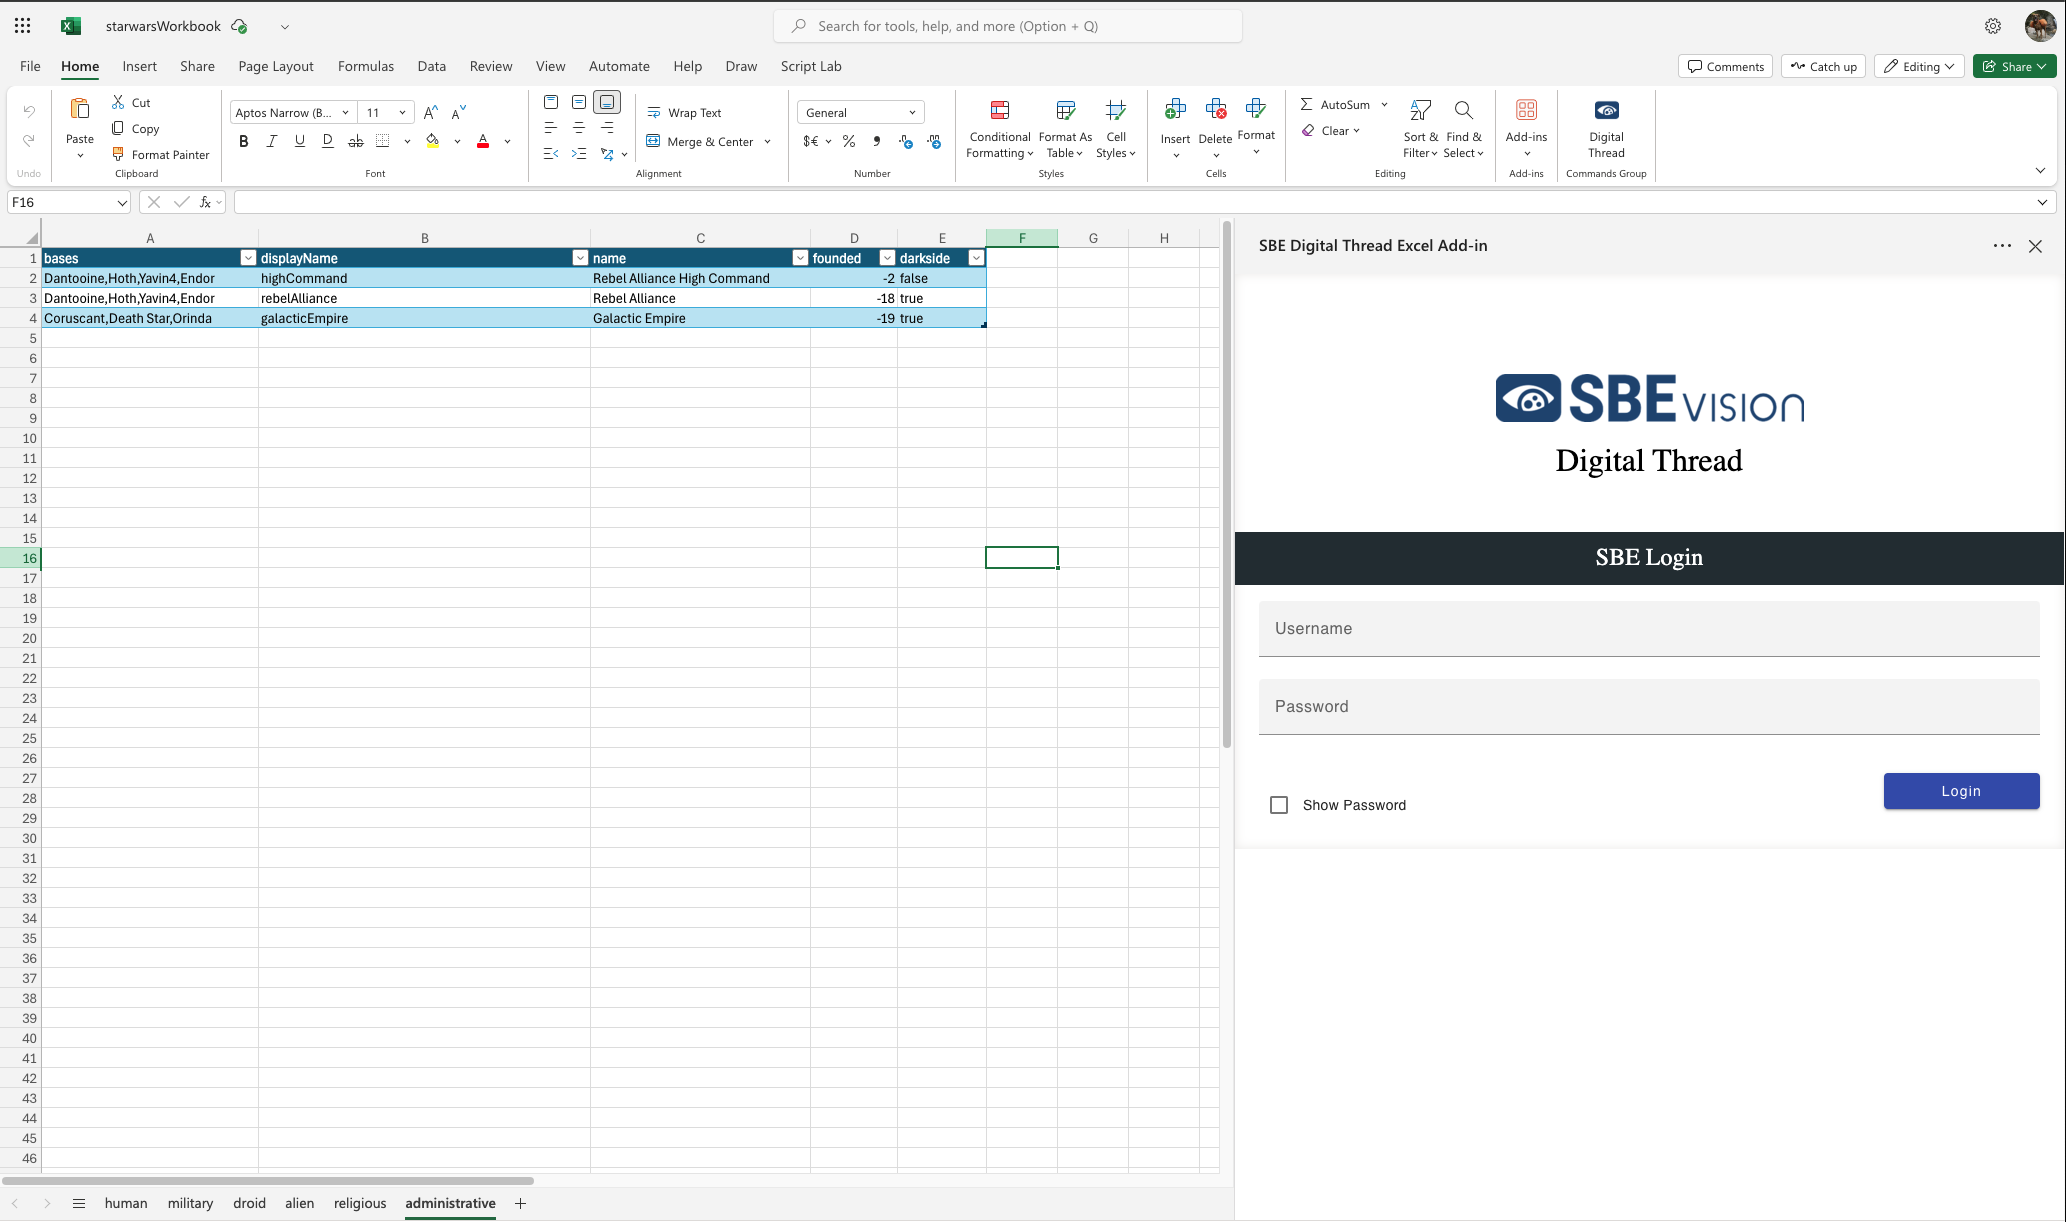
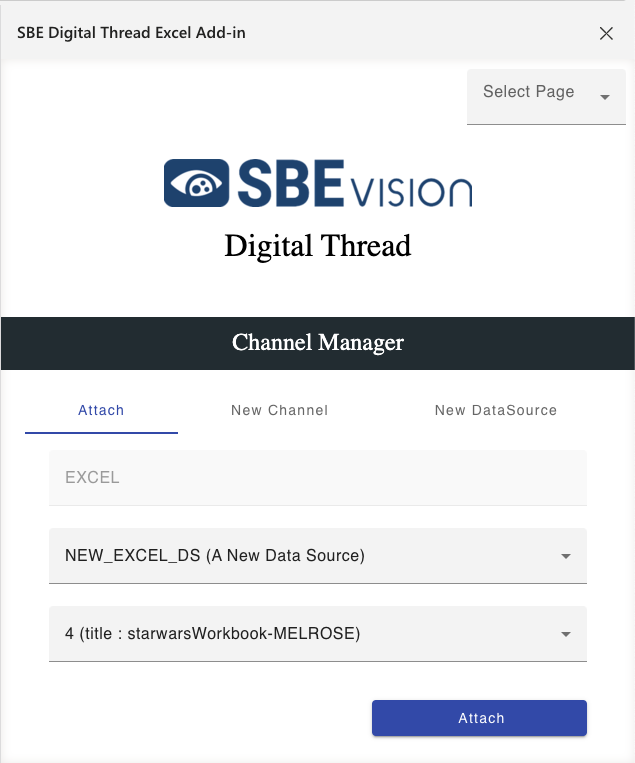
Upon successful login, if the work book has not been previously attached to the digital thread, you will be taken to the Attach tab of Channel Manager.
If one or more appropriate Data Sources and Channels are already set up within SBE, you can simply select them via the dropdowns on the Attach tab. Alternatively, you can create a new Data Source and Channel from within the plugin, as described in steps 4-6 below.
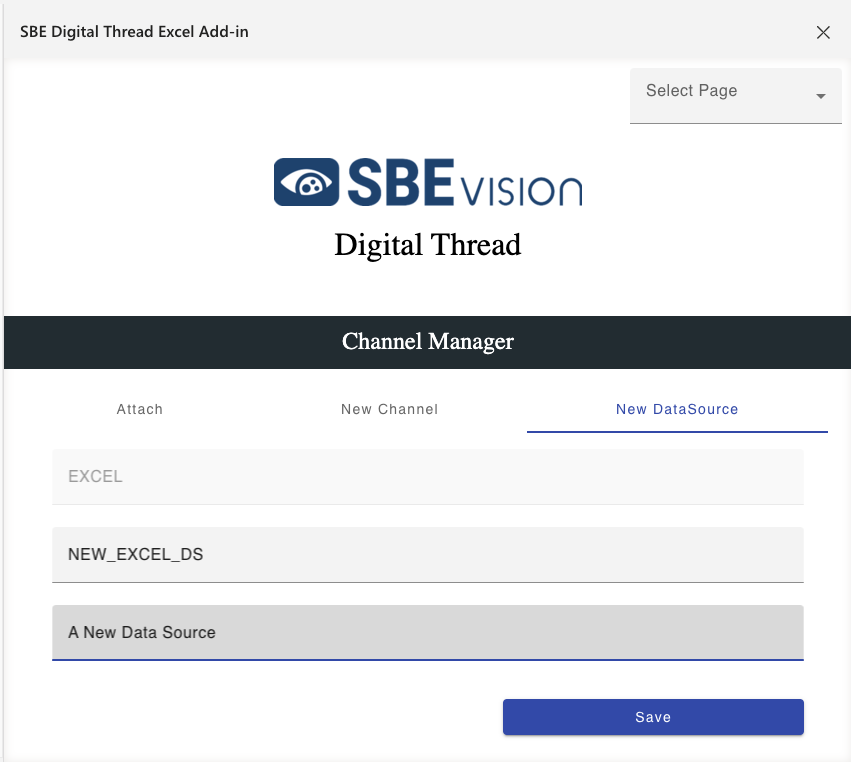
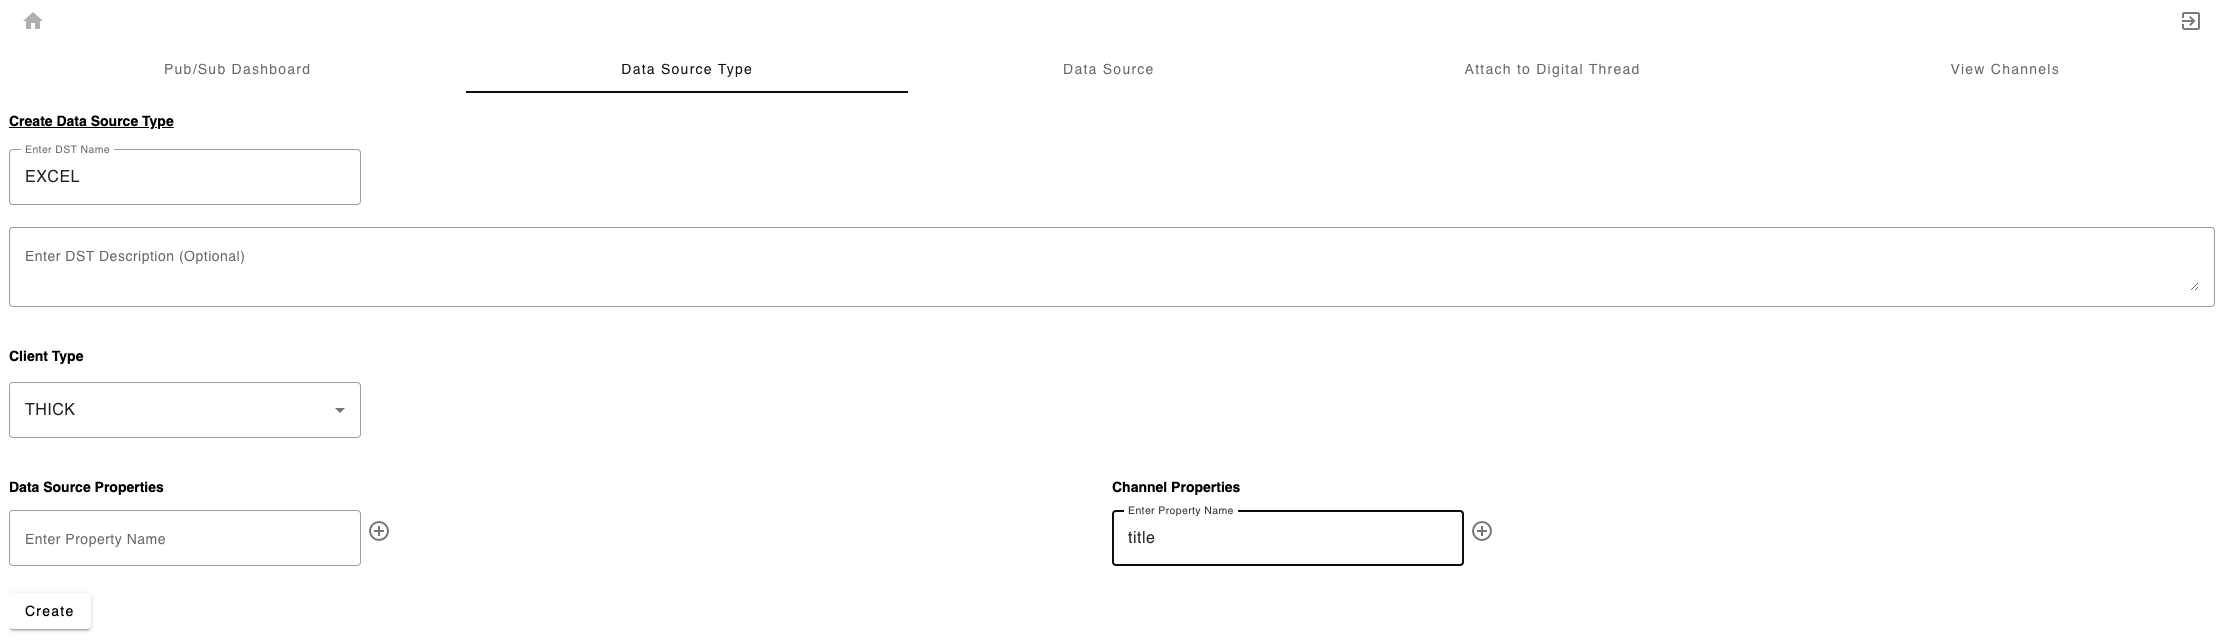
Note: An SBE project MUST have an existing Data Source Type to tie the new Data Source to. This Data Source Type must be titled “EXCEL” and contain one channel property named “title”.
After ensuring that an appropriate Data Source Type is set up in your Digital Thread, select the New Data Source tab. Give your Data Source a name and description (optional). Select the “Save” button. A popup notification will indicate that the new Data Source was created successfully.
Next, select the New Channel tab. Going to the New Channel tab will load the channel creation UI from the attached SBE stack. Here, you can select your newly created Data Source, and either chose an existing partition within your SBE project to which you’d like to attach, or check the “Create a new partition instead” checkbox and provide a name and permissions settings to have a new partition created. Click Next at the bottom of the form.
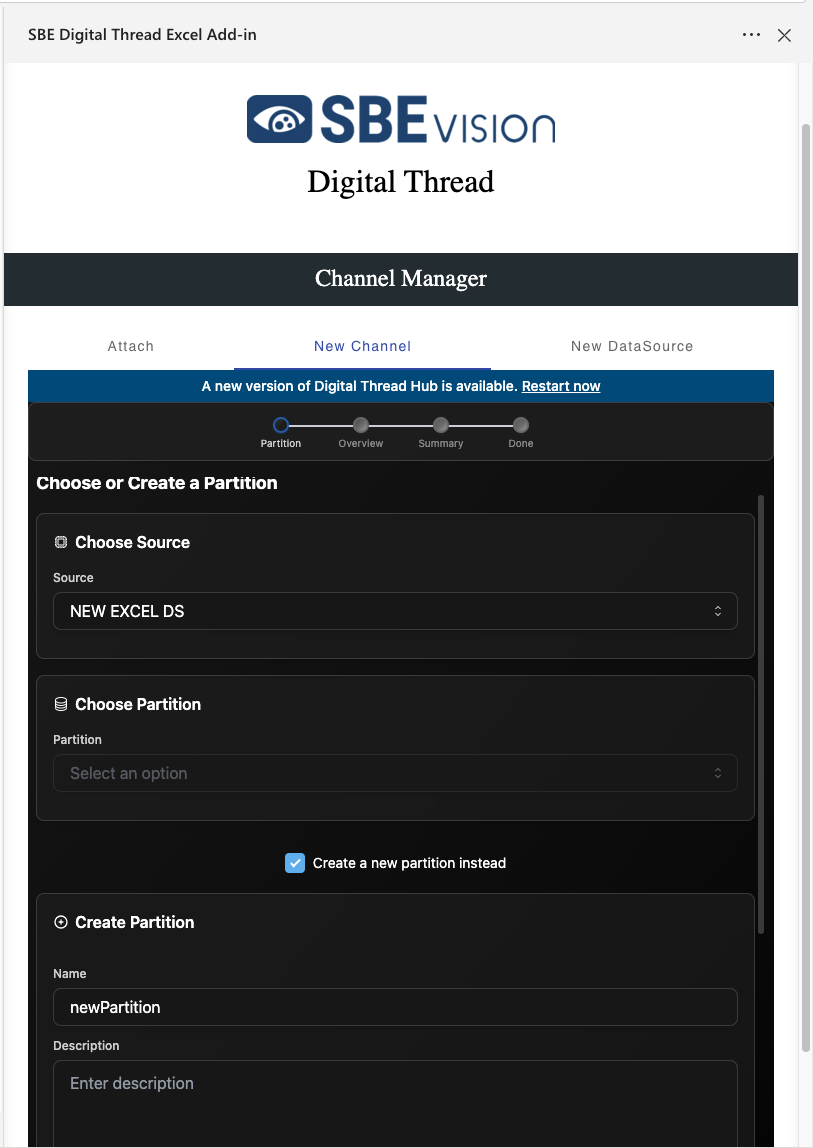
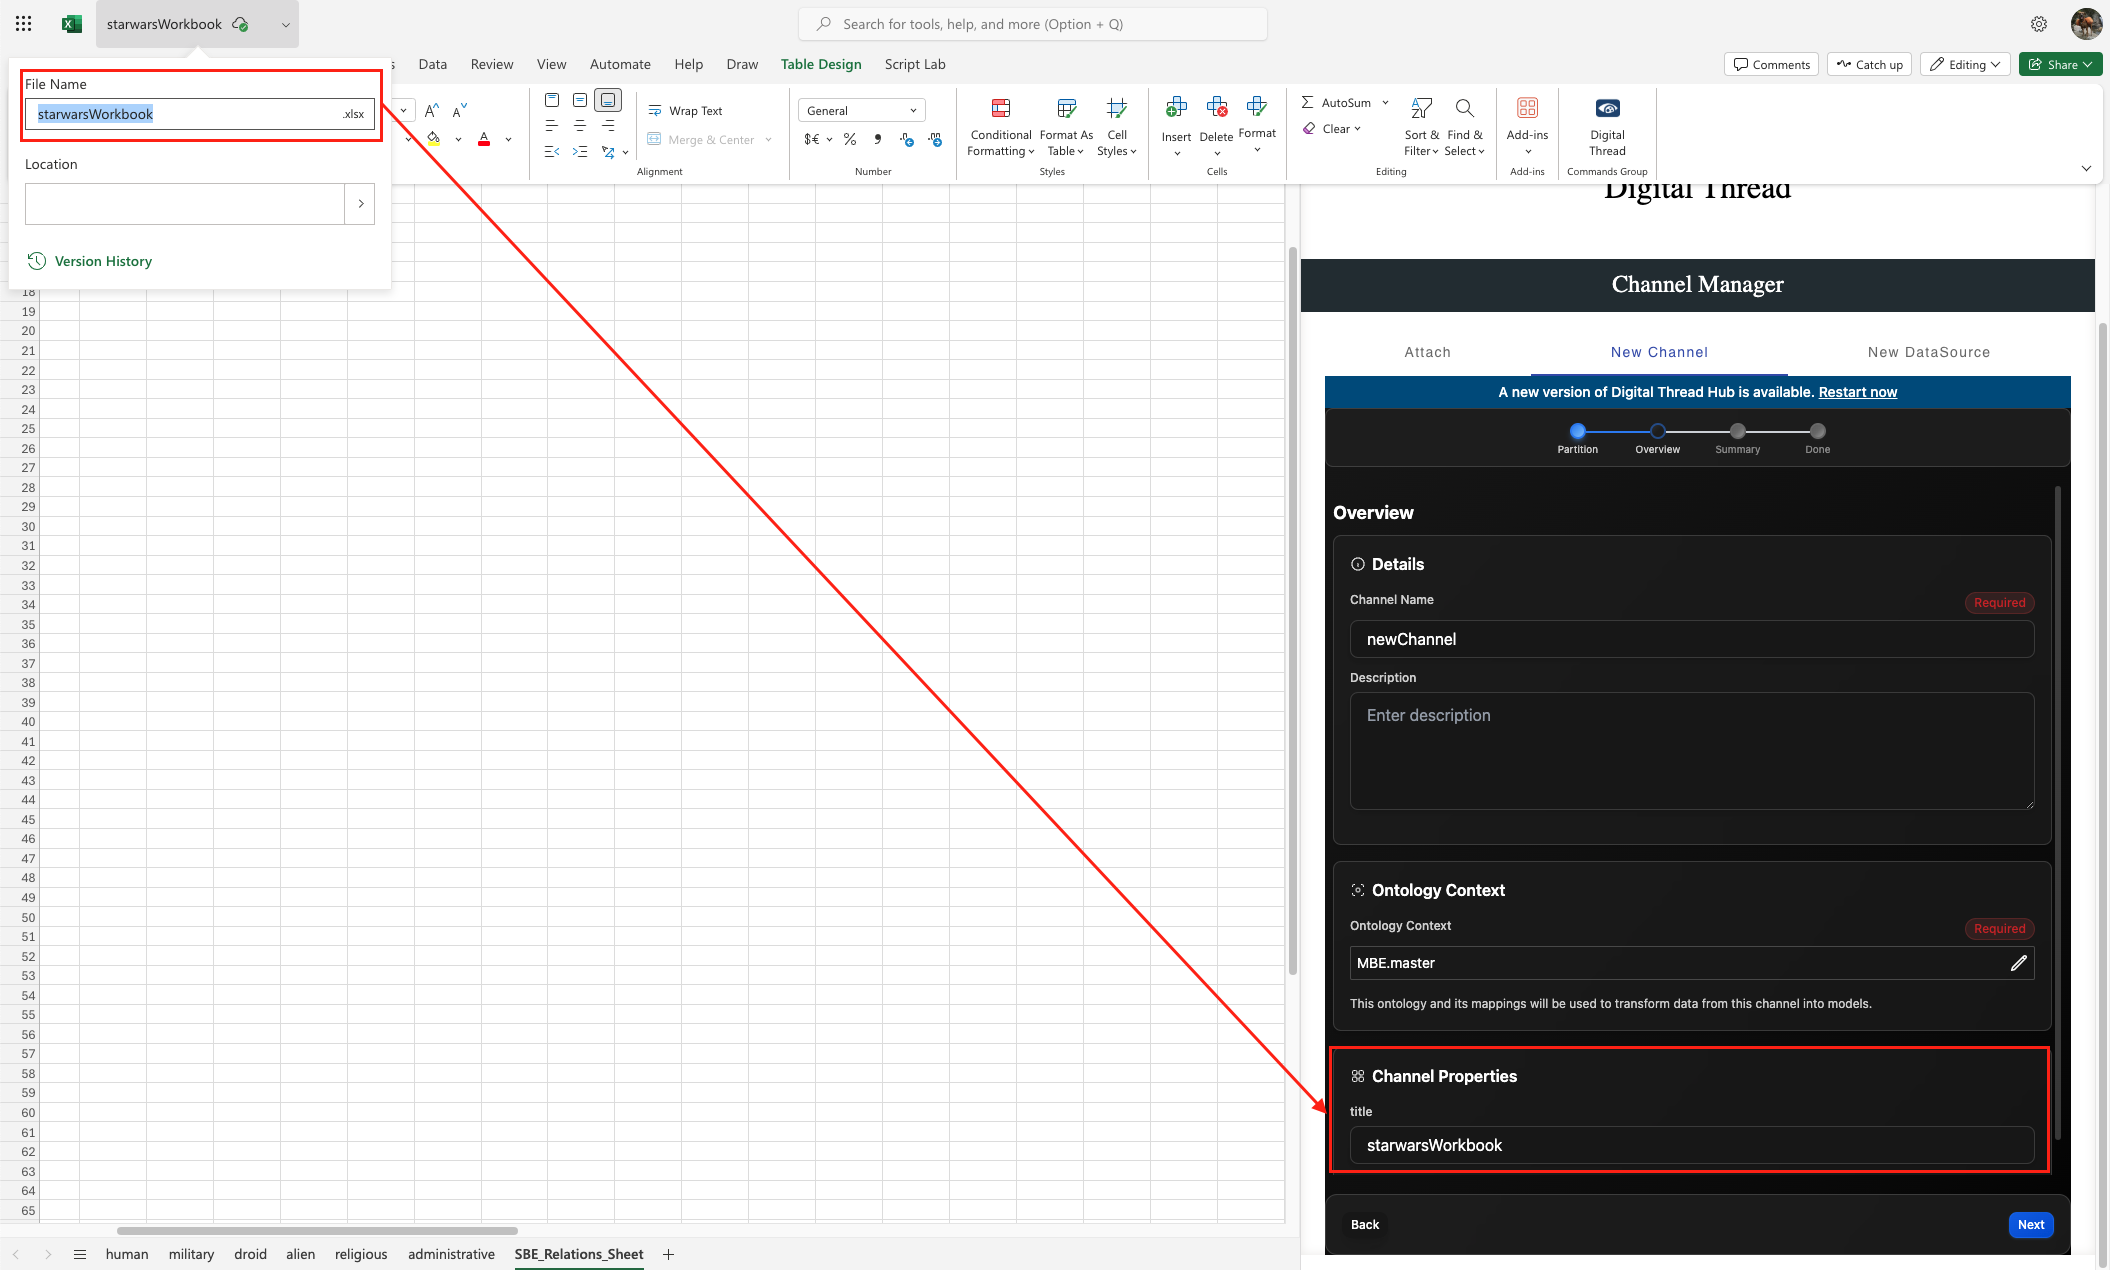
On the next screen, provide a name for the new channel and set the Ontology Context. The Ontology context must be the ontology containing the classes to which your data is mapped. Lastly, provide the title Channel Property. This MUST be the title of the workbook you are attaching to the digital thread, minus the extension. This value can be found at the top of the Excel application. Click “Next”. On the following screen, review your new channel details and click “Create Channel”.
Upon receiving confirmation of channel creation, return to the Attach tab, where you can now find and select your new Data Source and Channel in the dropdowns and click the Attach button.
Note: When working with SBE projects containing pre-existing Data Sources and Channels, only Data Sources tied to the EXCEL Data Source Type will be available in the dropdown. Once a Data Source is selected, the only Channels to be show will be those whose Data Source matches the selection and whose “title” property matches the workbook name.
Once the workbook is attached to the digital thread, thee things will happen:
A worksheet titled SBE_Admin will be created. By default, this worksheet is hidden, and should not generally need to be accessed by the user. This worksheet stores information about the connected channel and table configurations within your worksheet (i.e. which are to be published to the digital thread).
A worksheet titled SBE_Relations_Sheet will be created. This sheet contains a table called RelationsTable. The Relations Table will store relation/link information for subscribed models refreshed to the workbook. Links between Authoritative items can also be manually entered by the user. The Relations Table will be discussed in more detail in Section 11.4.
Lastly, you will be taken to the Table Manager page the SBE Digital Thread plugin. Note: If you have previously configured tables for publish in this project, you will be taken straight to the Synchronize Page. To return to Table Manager, simply select “Table Manager” from the “Select Page” dropdown in the upper right corner of the Add-In window.
1.4 Publishing Items
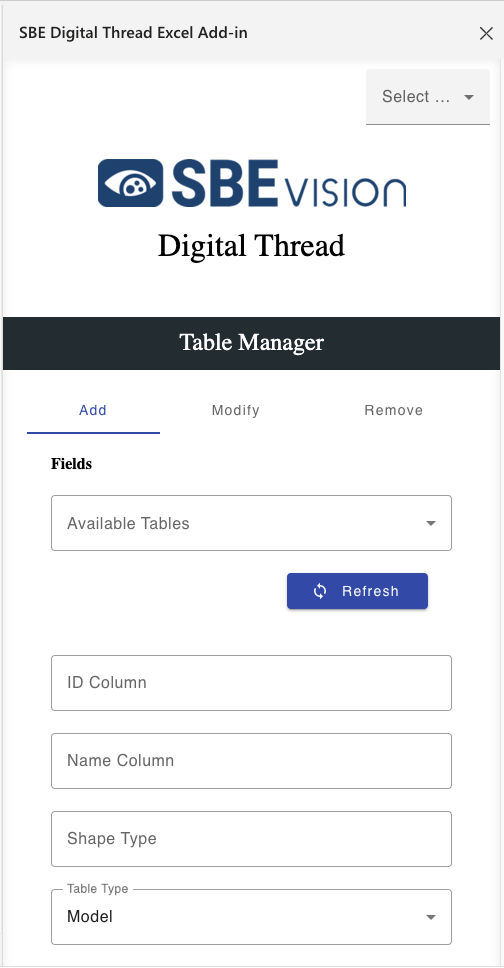
Table Manager
Table Manager allows the user to select the specific data that will be published to the digital thread. For the purposes of the SBE Digitial Thread Add-In, excel data is separated into three main entities. The primary entity is the table. Within the table are rows and columns.
When publishing a table to the Digital Thread, each row will be mapped to a single model. The columns represent properties of these models. Thus, each column header should be mapped to a property on the corresponding SBE model shape. Mappings must be loaded prior to any Publish or Refresh operation. Creating mappings are not covered in this document.
The SBE Digital Thread plugin does not recognize data that is not in a formatted Excel Table. To create an Excel Table, select the range of data cells that you would like to include and select “Table” from the insert menu. Check the “My table has headers” option in the pop-up and select “OK” (Figure 1.7).
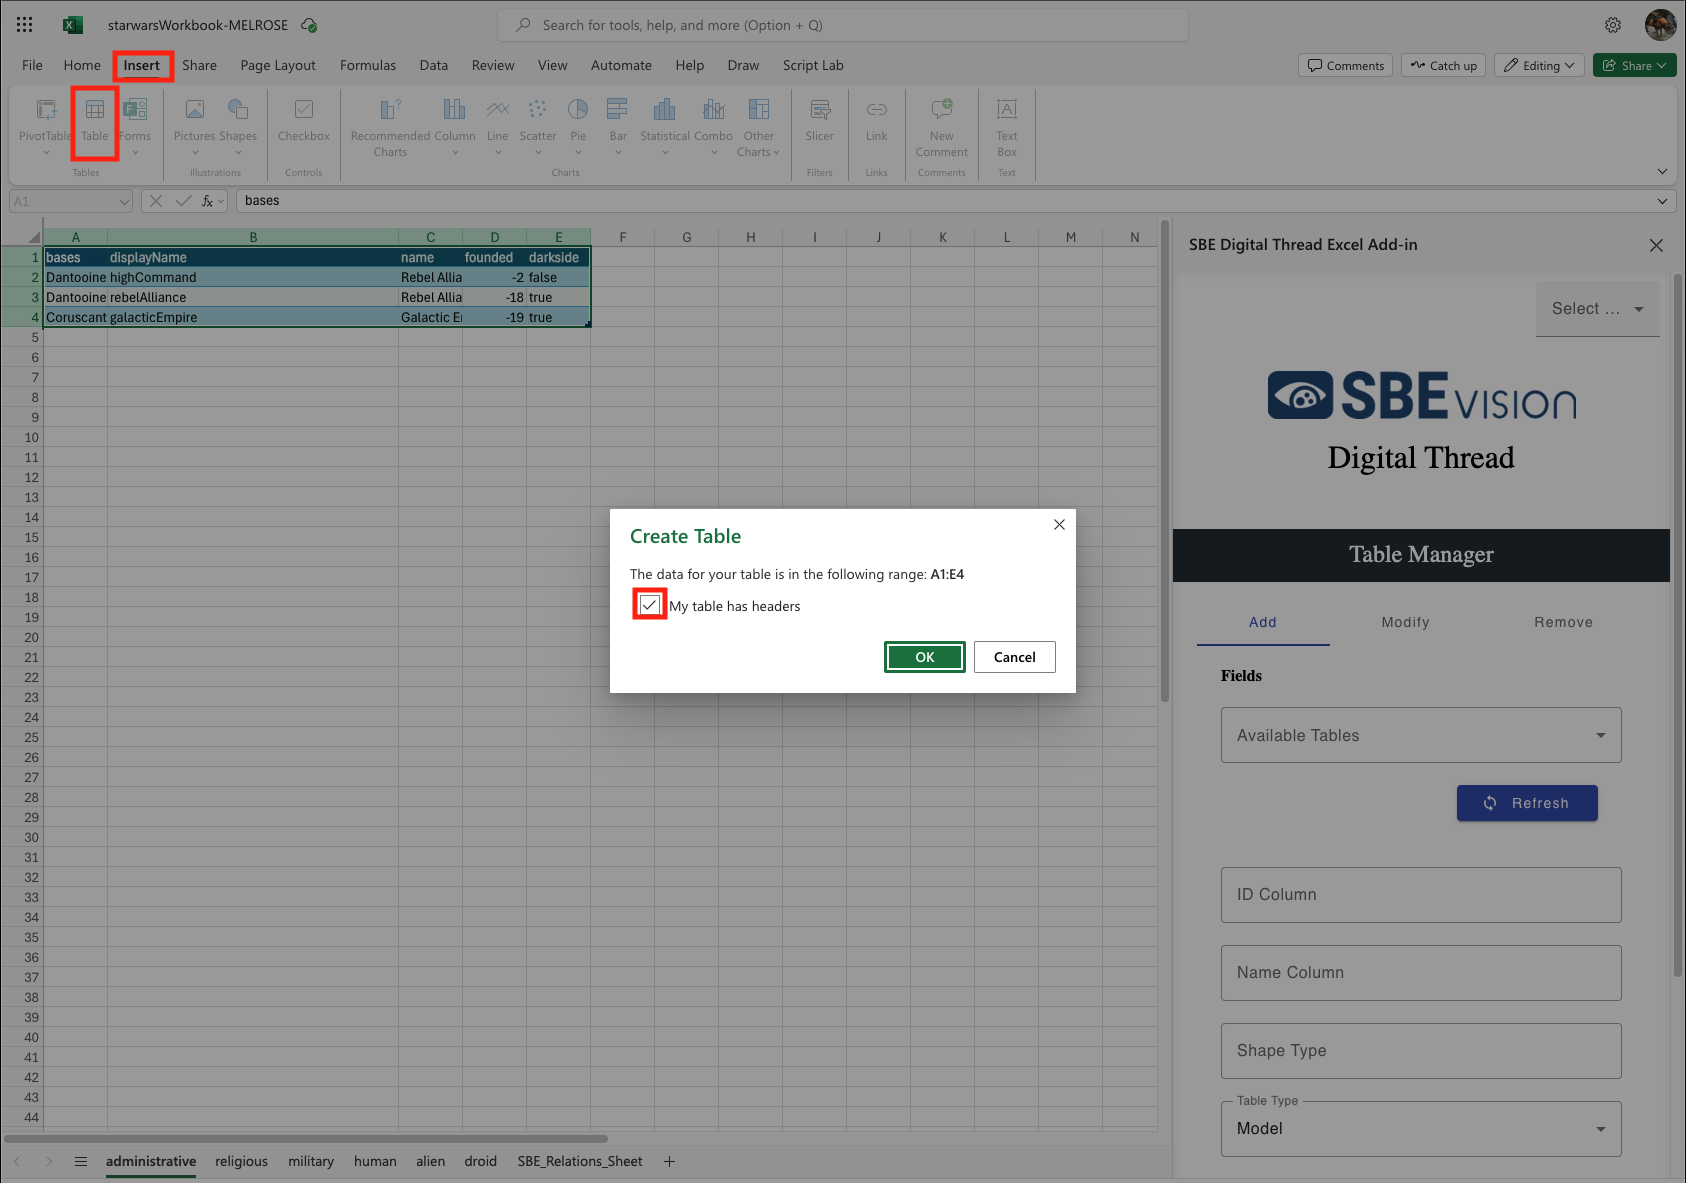
After creating the Excel Table, select any cell within the table and select the “Table Design” option from the menu bar. Use the text field in the upper left to name the table (Figure 1.8). Multiple tables can be created on the same worksheet, or tables can each have their own worksheet.
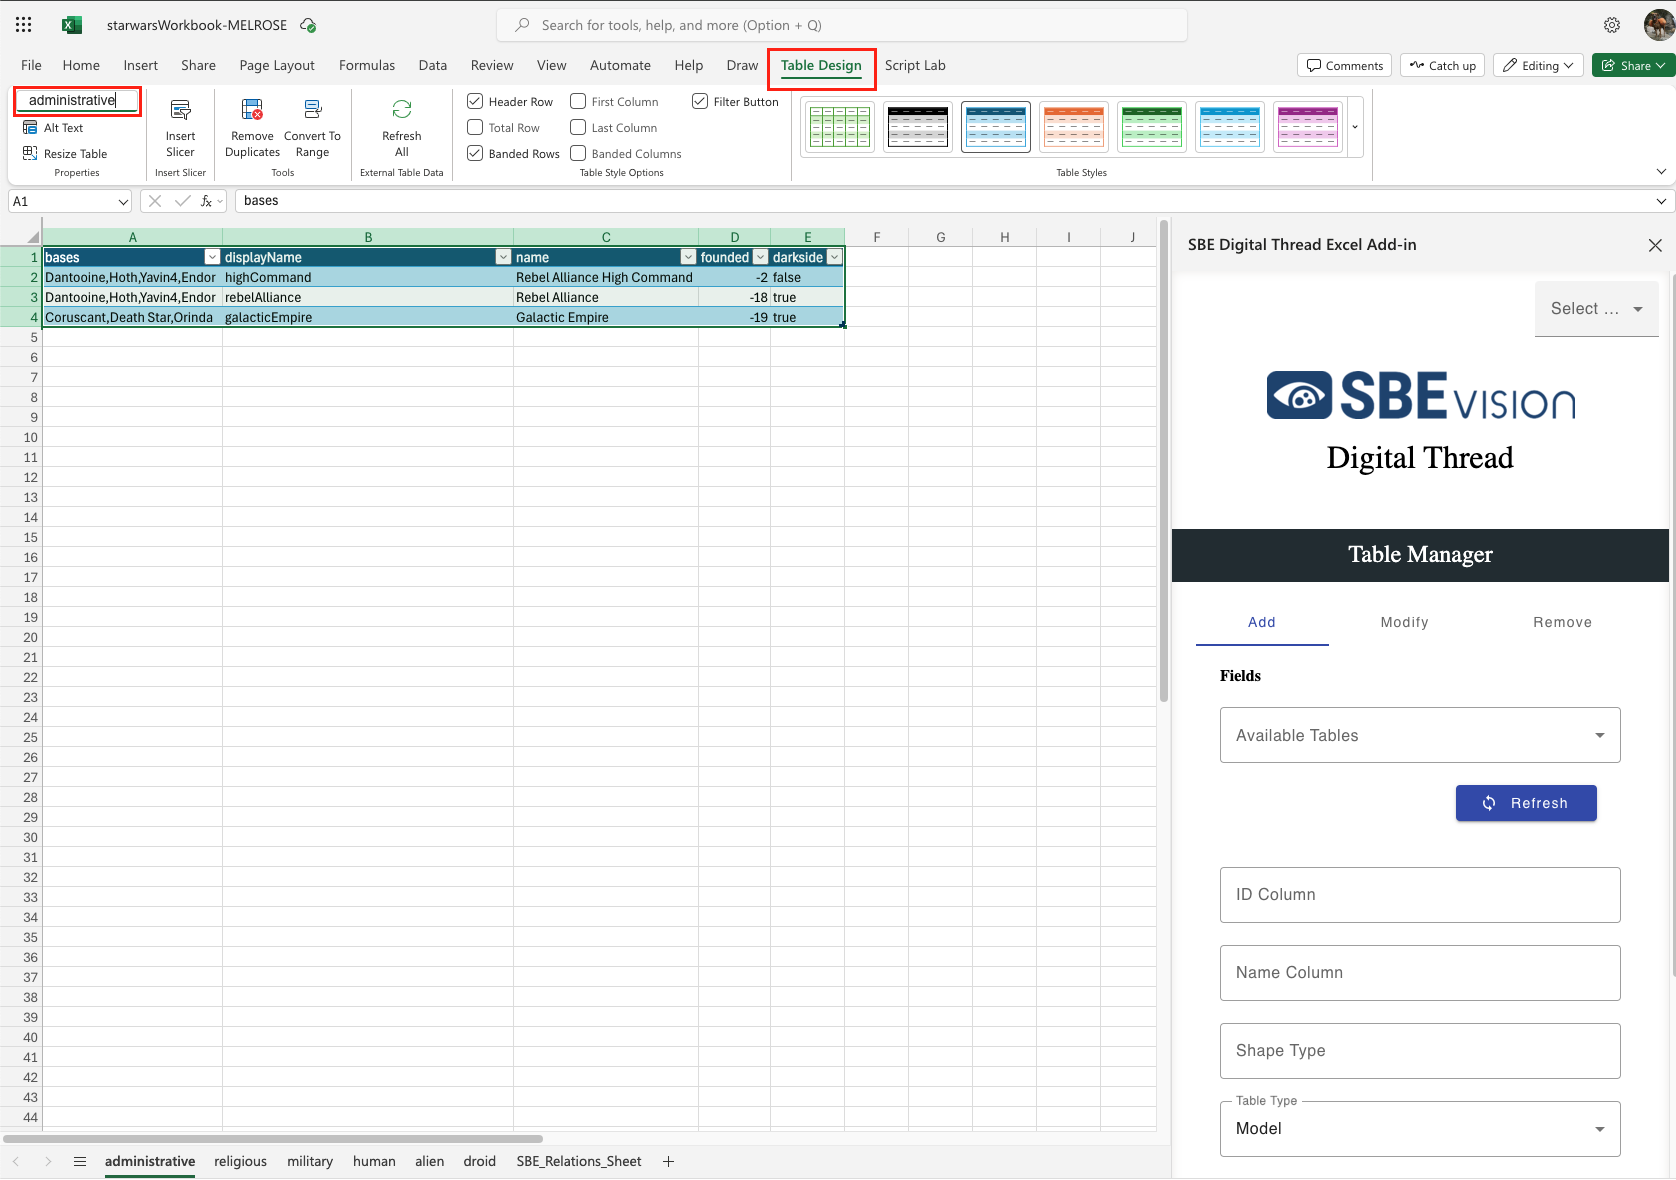
Once the Excel Table(s) is/are created, click the “Refresh” button in the Add tab of the Configuration Page within the SBE plugin. All available tables in the workbook will now be shown within the “Available Tables” dropdown (Figure 1.8).
Select a table that you would like to publish to the digital thread. When adding a table, the user must specify ID and Name columns. The column chosen as the ID must be a unique identifier, as this value will be used to identify the corresponding excel rows and SBE models during publish and refresh operations. The values from the column selected in the “Name” field will be used as model names within SBE.
The third textbox is the Shape Type. As mentioned above, this Shape Type must match the shapeId in the mappings loaded into the SBE project prior to Publish or Refresh operations.
The fourth field is the Table Type dropdown. There are two options to chose from, “Model“ and “Relation”.
a. If “Model” is chosen, each row will simply be mapped to a separate model within SBE. The table itself will not be represented within SBE.
b. If “Relation” is chosen, each row will be mapped to a separate model as above, but the table itself will also be represented as a model within SBE, with a “Contains” link to each item within the table.
Lastly, the “Has Merged Headers” checkbox allows the publishing of two layers of headers, with the top layer containing merged cells. When ingested, these headers will be flattened using a “–” between the major (merged) and minor (sub) headers. The headers will be re-expanded when refreshed back into Excel.
Upon filling in the fields described above and clicking “Add”, a pop-up will notify that the Admin sheet has been updated, meaning that the table has been added
Once added, tables will no longer be listed in the “Available Tables” dropdown on the Add tab.
Table Manager’s Modify tab allows you to make changes to the configuration of tables that were previously added. Once selecting a table from the “Available Tables” dropdown, each field set in the Add tab is displayed, allowing the user to make any necessary changes.
The Remove tab simply allows the user to remove previously added tables. Once removed, a table will not be published to or refreshed from the digital thread.
Publish
The Publish operation moves data from a connected system into the SBE platform.
From the “Select Page” dropdown, select “Synchronize” to go to the Synchronize Page.
The Synchronize Page opens to the Publish tab. The “Tables to publish” section lists all tables configured for Publish. If no tables are listed here, nothing will be published.
Upon clicking “Publish”, a pop-up notification should notify the user first that tables were refreshed. This simply means that the tables were located within the workbook and the data was refreshed locally and is ready to transmit to SBE. A second notification will inform the user that the publish was successful, and state the number of tables published to SBE. This notification simply means that the data was successfully transmitted from the workbook to SBE, and that the publish was accepted and started. Should any error be encountered, this will also be stated in a pop-up notification.
The Tracking ID will be displayed at the bottom of the Add-In window, including a hyperlink to the Tracking Center, where the progress of the publish within the SBE platform can be monitored.
1.5 Refreshing Items (Including Subscribed Items)
The Hard-Refresh operation moves data from the SBE platform to the Excel workbook.
Authoritative Data
Once published to SBE, authoritative data, that originating in the Excel workbook, can be pulled back into the workbook, including any additions, deletions or updates present with the digital thread via the Hard-Refresh operation.
Like the Publish tab, the Refresh tab includes a list of configured tables, labeled here as “Tables to Refresh”. Any tables present in this list will be refreshed, and all data in those tables will be replaced with that pulled from the digital thread. If a table is not listed under “Tables to Refresh”, it will not be refreshed, even if the data is present in the digital thread.
The SBE_Relations_Table will be also updated with relation data from the digital thread.
Subscription Data
When performing a Hard-Refresh operation, SBE will check for existing subscriptions on the connected Channel. If any subscriptions are found, the subscription data will be returned along with the updated authoritative data.
The first time that a subscription is refreshed, a worksheet and table will be auto-generated to hold this data. The worksheet name will be a combination of the shapeId of the items in the table, and an numeric counter (e.g. “requirement_1”). Each combination of shapeId and subscription will have its own worksheet/table. So, if a channel was subscribed to items of shapeId “issue” from two different sources, a Hard-Refresh would result in an “issue_1” and “issue_2” worksheet. On each worksheet would be one data table, named as a combination of the shapeId and subscriptionId (e.g. “issue_xxxxxxxxxxxxx”), and containing only the “issues” items from the corresponding subscription.
When a subscription table is created via Hard-Refresh, it is automatically added to the list of configured tables, and will be seen on the “Tables to publish” and “Tables to refresh” lists. At this point, that table can be managed, via the Table Manager, just like an authoritative table. If the table is removed from the configuration, it will no longer be included in Publish or Refresh operations, even though the subscription still exists and the data is still present in the digital thread.
In either case, the SBE_Relations_Table will be updated with relation data from the digital thread.
When subscription data is refreshed into an excel workbook, an additional worksheet, called “SBE_Control_Sheet” (Control Sheet) is created. This worksheet is created to store metadata necessary to property publish the data back into SBE. Like the Admin sheet, the Control Sheet is hidden and should not need to be accessed by the user.
1.6 Verify
The Verify operation examines the data in the digital thread and the connected Excel project to “verify” that the data is in sync.
The Verify option is available on the Refresh tab. After clicking Verify, a pop-up will notify that the verify was submitted, and the Tracking ID will be displayed. Clicking the hyperlink on the Tracking ID will take the user to the Tracking Center entry for the Verify operation. Once completed, the results can be viewed by by selecting “Download Logs (Detailed)” from the drop-down menu in the upper right corner of the tracking screen. These results show an item-by-item comparison of each corresponding Excel item (row)/SBE model pair, indicating any discrepancies between the two in properties, relations or metadata..
1.7 Advanced Operations
Clear Drafts
A Soft-Refresh, also called a Rebase, is very similar to a Hard-Refresh, discussed in Section 1.5. However, the Soft-Refresh is designed to preserve any changes made in the workbook since the most recent publish to the Digital Thread.
2. Document Overview
2.1 Document Overview
This document provides essential information for using, configuring, and supporting the SBE Vision adapters for Excel. It covers multiple adapter products, each supporting different versions of the external tool. There is a different version of this document for each major release of the SBE Platform.
2.2 Document Orientation
This document is designed to inform users with various roles:
End Users should begin with Section 1 to understand how to access and operate the adapter, and Section 5 for issues pertaining to the setup, configuration, and use of the digital tool itself.
Digital Thread Specialists should focus on Section 1, and also consult Sections 3, 4, and 5 for deployment and semantic mapping. Section 11 contains details related to mapping items from this tool into a semantic ontology.
Administrators should refer to Section 6 and beyond for setup, security, support, and version management.
3. Adapter Use Cases
3.1 Adapter Overview
The SBE Excel Adapter is used to connect an Excel workbook to the digital thread. It is a hybrid adapter, as the adapter itself runs as a service on an SBE stack, but is controlled via a plugin within the Excel application itself, rather than through the SBE Digital Thread Hub UI.
The excel-adapter can be loaded as an “Add-In” on the Microsoft Excel web application (via Sharepoint or Office 365) or in the Windows or Mac Excel desktop applications. Installation for desktop Excel clients is simplified via Windows and Mac installers that can be downloaded from an endpoint on the service itself, as described in Section 1.2.
Upon loading the Add-In and logging in with SBE credentials, the Excel Adapter allows a user to select tables from the attached workbook and perform all basic SBE data operations (Full-Publish, Full-Refresh, Verify and Reset). Being an SBE Lite adapter, some advanced operations are not available. All operations can be performed on both authoritative and subscription data.
4. Supported Versions
4.1 Supported Adapter Products
Excel-Adapter 8.0
4.2 External Tool Versions Supported
The Excel Adapter utilizes the Excel JavaScript API. This API is compatible with the following Microsoft Office/Excel Products:
Windows Microsoft 365 / Retail Office | Windows Volume-Licensed Perpetual | Office on Mac | Office on the Web |
|---|---|---|---|
v. 15009 (Build 4266.1001) | Office 2016: v. 1509 (Build 4266.1001) | Version 15.20 | Current |
4.3 Differences Across Tool Versions
The Excel-Adapter is only available in version 8.0 for SBE 8.x (Melrose)
5. Digital Tool Best Practices
5.1 Tool Configuration Considerations
The Excel Adapter requires minimal external configuration.
The configuration requires no Data Source Properties. However, when configuring a Channel for your connection to the Digital Thread, you must include a Channel Property called “title”, and the value must match the name of your Excel workbook (minus any extension). If the “title” property is not an exact match of your workbook name, the channel will not be available in the Channel dropdown on the Attach menu.
5.2 Usage Tips & Gotchas
No recurring issues/traps or necessary workarounds have been identified.
5.3 Tool Limitations and Workarounds
Excel-Adapter utilizes the SDK Lite Typescript-SDK. As such, functionality is limited to operations available to SDK Lite adapters.
6. Installation
6.1 Installation Instructions
Detailed installation instructions can be found in Sections 1.1 (Operations Overview) and 1.2 (Accessing the Adapter).
6.2 Configuration
The bulk of the configuration is performed within the adapter itself, as described in Section 1.4 (Publishing Items). There are no Data Source properties and only one Channel property, which simply specifies the workbook to which the channel will be attached.
6.3 Data Source Type Definition
Data Source Type
The Data Source Type (DST) is a generic designator that tells SBE the identity of the external system that a Data Source, Channel or Connection are targeting. The Excel Adapter handles all operations on Channels tied to Excel, as indicated by an associated DST with name “EXCEL”.
The EXCEL DST can be associated with multiple Data Sources, thus allowing connection to multiple Excel workbooks on different channels. To accomodate this, the DST specifies two one Channel Property, “title”, which specifies the file name of the workbook to which the channel will attach.
The EXCEL Adapter requires a Data Source Type named “EXCEL”. The EXCEL DST can be created within the SBE platform. From the Admin Page, click “Data Source Manager”. Once in the Data Source Manager, a new DST can be created under the Data Source Type tab. The “Client Type” should be set to THICK. The DST should have no Data Source Properties and one Channel Property: “title” (Figure 6.1).
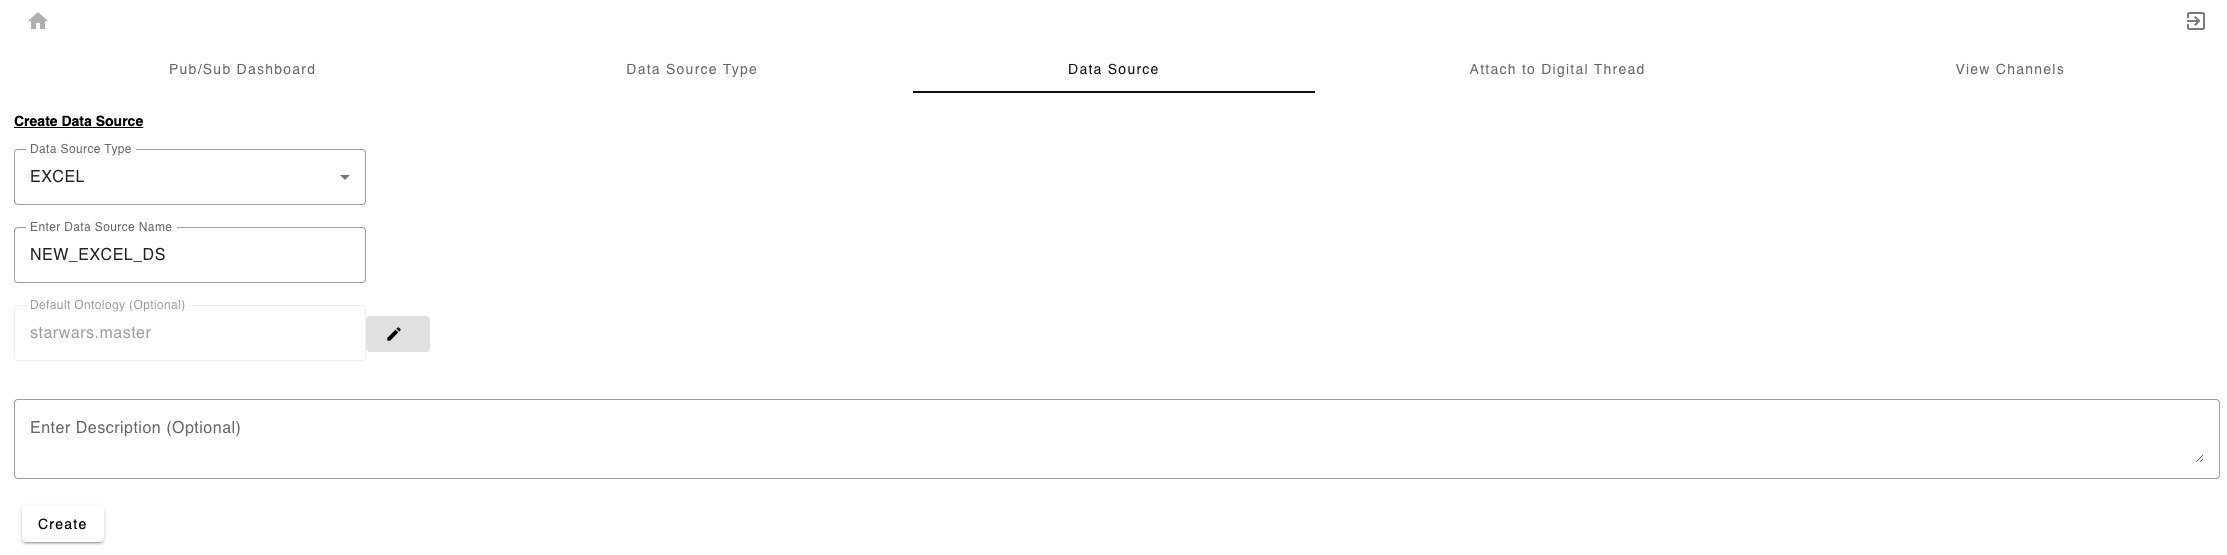
Data Source
Though there are no Data Source Properties, a Data Source is still required. The Data Source can be created within the SBE platform prior to connecting your Excel workbook, or it can be done within the Excel Adapter Add-In itself.
Creating the Data Source within SBE Platform:
In the Data Source Manager, select the Data Source Tab. Select the “EXCEL” Data Source Type from the dropdown menu, give your Data Source a name and select an ontological context (Figure 6.2).
Creating the Data Source within the Add-In
After ensuring that an appropriate Datasource Type is set up in your Digital Thread, select the New Datasource tab. Give your Datasource a name and description (optional). Select the “Save” button (Figure 1.3). A popup notification will indicate that the new Datasource was created successfully.
7. Channels and Mappings
7.1 Channel Definition
The Channel details the two endpoints of data operations between your Elasticsearch project and the digital thread. Like the Data Source, the Channel can be created within the SBE platform, or in the Excel Adapter Add-In itself.
Creating the Channel within SBE Platform
Confirm that an “EXCEL” DST and appropriate DS were set up as described in Section 6 above.
In the Data Source Manager, click the “Attach to Digital Thread” tab:
Select your newly created Data Source (above) from the “Data Source” dropdown. Click “Next”.
Under “Configure channel properties”, select the ontological context for your dataset and set the “title” Channel Property.
The “title” Channel Property must match the file name of the Excel workbook to which the channel will attach, minus any extension.
Creating the Channel within the Excel Adapter Add-In
Confirm that an “EXCEL” DST and appropriate DS were set up as described in Section 6 above.
On the Channel Manager Page of the SBE Excel Adapter Add-In, select the “New Channel” tab. Either select an existing partition within your SBE project to which you’d like to attach, or check the “Create New Partition” checkbox. In the expanded menu, select the appropriate Datasource. Give the new partition a name and (optional) description. Set the premissions for the partition in the Security Groups section and select the “Create Partition” button (Figure 7.1).

Once the partition is selected, select or create a branch to attach to by entering a branch name and clicking “Create Branch”.
Once a branch is chosen, the Chanel Manager + Publish menu will expand, allowing you to set the “title” channel property. The “title” channel property will automatically be assigned to the title of the workbook, minus any extensions (e.g. if the workbook is testWorkbook.xlsx, the “title” property will be testWorkbook). If you are in the workbook you plan to publish from, do not edit this value. Simply click “Create Channel”. A success message will indicate that the channel was created and the channel will be displayed.
Selecting “Go to Save” at the bottom of the window will return you to the Attach tab, where the new Datasource and Channel can be selected via the dropdown menus. Select Attach.
Note: When working with SBE projects containing pre-existing Datasources and Channels, only Datasources tied to the EXCEL Datasource Type will be available in the dropdown. Once a Datasource is selected, the only Channels to be show will be those whose Datasource matches the selection and whose “title” property matches the workbook name.
7.2 Approaches to Mapping
Excel is a simple spreadsheet application that stores data as 2-dimensional tables. As such, almost any kind of data, comprising any number and combination of fields is able to be represented. There are therefore no pre-defined shapes, shapeIds or mappings for the Excel Adapter.
While configuring tables in Table Manager, as described in Section 1.4, a “Shape Type” must be entered. This value must be the shapeId to which the items are mapped in the mappings.
Additionally, all fields within each table must be mapped as a property of the shape or they will be dropped in a Publish or Refresh operation.
8. Security and Access
8.1 Authentication Methods
See RFC 006 - Authentication & Authorization for the standard on how to authenticate to use SBE and adapter services.
Excel-plugin, while running as an Add-On inside Excel, is a fully integrated microservice on the SBE user stack, as is the back-end excel-consumer. Therefore, to access the SBE Excel Adapter Add-In, a user must log in using valid SBE platform (keycloak) credentials. Additionally, the user must have approprieate permissions (Read, Write, and/or Manage) for the operation being performed.
8.2 Authorization and Roles
Role-based access models
User-to-role mapping
8.3 Secure Communication
TLS configuration
Firewall or VPN guidelines
8.4 Identity Integration
LDAP, SSO, or identity federation
9. Release Notes
9.1 Version History
8.1
Adds batch loading for links and control items
Adds Clear Drafts button
Adds installers for Windows and Mac desktop Excel apps
Fixes bug publishing/refreshing HTML power type
8.0
Transitioned from the 7.x woburn dual-service excel-plugin/excel-consumer architecture to a single-service hybrid adapter utilizing the SBE Typescript-SDK.
Performs all operations of and SDK-Lite adapter, including full-publish, full-refresh, verify and reset.
Performs operations above on both authoritative and subscription data.
Supports SBE Power Types
9.2 Breaking Changes
No breaking changes have been identified.
11. Technical Reference
11.1 Adapter API Endpoints
While accessed and displayed within the Excel Add-In window, the Excel-Adapter runs as two microservices on the SBE deployment. The two microservices communicate via http, but no external API endpoints are exposed. The excel-consumer communicates with the SBE platform via grpc and similarly exposes no outside endpoints.
11.2 Identity
When configuring a table for Publish within the Excel Adapter, an ID field must be selected. This field must include a unique ID for each entry/row of data being published. SBE utilizes a combination of this unique ID and the table name on which is found as an external locator, allowing identification of the item across multiple Publish and Refresh Operations.
When subscription data is refreshed, tables are auto-generated for each shapeId in the dataset. All properties of the shape are mapped to table columns. Additionally, the SBE unique Correlation ID is saved in the table, and the SBE unique Subscription ID is included in the table name. These values are utilized to identify subscription items on future Publish and Refresh operations.
It is therefore pertinent that neither the CorrelationId field, or those designated by the user as the “ID Field” are altered.
11.3 Configuration File Format Reference
The Excel Adapter runs as an Add-In on Microsoft Excel. The Add-In is loaded via a manifest.xml file. The raw file (for online versions of Excel) and Windows/Mac installers are available from the excel-adapter endpoint as described in Section 1.2.
11.4 Schema Support
Excel is a simple spreadsheet application that stores data as 2-dimensional tables. As such, almost any kind of data, comprising any number and combination of fields is able to be represented. There are therefore no pre-defined shapes or schemas for Excel data.
In creating mappings, the user must be sure to set the shapeIds to match the values assigned to “Shape Type” for each table in Table Manager.
Additionally, all columns of a table must be mapped as a property of the shape.
Relations between items are stored in Excel in the Relations Table on the “SBE_Relations_Sheet”. Relations are supported in both subscription and authoritative data. On a refresh, RelationsTable entries are created automatically for each link on refreshed data. Users are also able to create their own Relation Index entries to represent relations on authoritative data or between authoritative and subscription data. The schema for the Relations Index is shown below, where the “Source ID” and “Target ID” are either the SBE Correlation ID (subscription items) or the value of the field configured as the “ID Field” for the item’s table (authoritative item).“RelationName” is the mapped external relation name:
Source Table | Source ID | Relation Name | Target Table | Target ID |
11.5 Glossary of Terms
11.6 Compliance and Certification
Maturity | Key Verification Parameters |
|---|---|
Level 1 | Design Ready, Review documentation |
Level 2 | Technology Demonstrated for initial scope. |
Level 3 | Test full-publish, full-refresh on authoritative and subscribed entity sets on current release train. Review Architecture. |
Level 4 | Test all actions on current and future release trains. Test mandatory telemetry. Basic tests are automated. Review Architecture and adoption of best practices. |
Level 5 | Tuned for performance. Introspectable. Full test automation. Stable for 6 months. |
Level 6 | Realizes all domains. Automated L3-L5 tests passes. Stable for 6 months. |
Level 7 | Ongoing security and dependency patches. Stable for a year. |
Excel-Adapter is currently rated at Level 3 in the adapter maturity model.